Azure SQL Database Student Registration Portal

Cloud Database Deployment, SQL Configuration and Front-End Setup
Project Topic
Deploying an Azure SQL Database for a Student Registration Application and preparing the application front end.
Architecture
Microsoft Azure Portal • Azure SQL Database • Azure SQL Logical Server • SQL Server Management Studio (SSMS) • Visual Studio Code • HTML/CSS/javerScript
Project Workflow
Azure login → Azure SQL Database → Resource Group → SQL Server → Networking/Firewall → SSMS →
Get ifeanyi marvelous akpati’s stories in your inbox
Join Medium for free to get updates from this writer.
Students table → Test data → VS Code Student Registration form
Introduction
This project demonstrates the creation and configuration of a cloud-hosted relational database for a Student Registration application. The database is deployed in Microsoft Azure as Azure SQL Database, secured through SQL Server networking and a firewall rule, and accessed using SQL Server Management Studio. A Students table is created and tested with sample data, providing evidence that the database is ready to support application data. The project then moves into Visual Studio Code, where the Student Registration front-end form is prepared.
How to Login to Microsoft Azure First

Project Overview
The project begins by locating Azure SQL Database and selecting the free database offer. It then creates a resource group and SQL logical server, configures StudentPortalDB, reviews the deployment, and verifies the resources. Networking is configured with selected public access and a client firewall rule so SSMS can connect. The database is then created and tested before the Student portal front end is opened in VS Code.
Open Azure SQL Database

The screenshot shows the Azure Portal search for Azure SQL Database. The search results provide access to the SQL Database service, which is used to create and manage the cloud database for the Student Registration application.
Start the Free SQL Database offer

The Azure SQL databases page shows that no databases currently exist. The Create menu is opened, with SQL database (Free offer) selected. This option provides a suitable free environment for the Student Registration learning project. The step begins the process of creating the Azure SQL database.
Create the Resource Group

The screenshot shows the Create SQL Database page with the Create new resource group dialog open. The resource group name student-portal-rg is entered to organize the database and related Azure resources. Confirming the dialog creates the resource group and makes it available for the deployment.
Configure the SQL Logical Server

The screenshot shows the Create SQL Database Server configuration page. The logical server is named student-portal-server1, with West US 2 selected as the location and SQL authentication enabled. The administrator login is set to sqladmin, with a password provided. These settings configure the logical server that will host the StudentPortalDB database.
Configure the Database

The screenshot shows the database details section of the Azure SQL creation page. The database is named StudentPortalDB and uses the student-portal-server1 server in West US 2. It is associated with the student-portal-rg resource group created earlier. The Review + create button is available to validate the configuration before deployment.
Review the Configuration

The screenshot shows the Review + create page with the main deployment settings for the Azure SQL Database. It confirms the student-portal-rg resource group, West US 2 region, StudentPortalDB, SQL authentication, server details, and free-offer configuration. Reviewing these settings ensures the database configuration is correct before deployment.
Confirm successful deployment

The screenshot shows a green confirmation that the Azure SQL Database deployment is complete. The deployment is associated with the student-portal-rg resource group, with an option to view the deployed resources. This confirms that the database provisioning was completed successfully.
Verify deployed resources

The screenshot shows the student-portal-rg resource group overview in Azure. It contains the student-portal-server1 SQL server and StudentPortalDB database, both located in West US 2. This confirms that the main Azure resources required for the project were successfully created and grouped together.
Configure SQL Server networking

The screenshot shows student-portal-server1 networking settings with public access limited to Selected networks. This allows specific firewall rules to control access and enables SSMS to connect securely to the Azure SQL server.
Add the client IP firewall rule

The screenshot shows the Firewall rules section where the client’s IPv4 address is added as an allowed rule. Saving the configuration applies the firewall rule needed for the development connection.
Connect from SQL Server Management Studio

The screenshot shows the SSMS Connect dialog configured with the Azure SQL server details. SQL Server Authentication is selected with the sqladmin username and password, and Trust Server Certificate is enabled to establish the connection.
Confirm the Azure database connection

The screenshot shows SSMS Object Explorer after connecting to the Azure SQL server. The StudentPortalDB database is visible under the Databases node, confirming that the connection was successful.
Create the Students table

The screenshot shows a SQL query creating the Students table in StudentPortalDB. The table includes StudentID as an identity primary key, along with FullName, Email, Course, and RegistrationDate fields. The successful execution confirms that the table was created correctly.
Verify the table structure

The screenshot shows a SELECT * FROM Students query being executed in SSMS. The results display the StudentID, FullName, Email, Course, and RegistrationDate columns. The empty results confirm that the table is created and ready to store student records.
Insert Test Student Data

The screenshot shows an INSERT INTO Students statement being executed in SSMS. A test student’s name, email, and Cloud Engineering course are entered, while the database handles the identity and registration date. The message confirming one row was affected shows that the student record was successfully inserted.
Verify the Inserted Record

The screenshot shows the SELECT * FROM Students query being executed again after the test data was inserted. The results display StudentID 1 with the student’s details, Cloud Engineering course, and registration date. This confirms that the record was successfully stored in StudentPortalDB and the database is working correctly.
Open the Application Project in VS Code

The screenshot shows Visual Studio Code with the File menu open and Open Folder selected. This allows the correct Student Registration project folder to be opened. It marks the transition from database administration to front-end application development.
Select the Student Portal Project Folder

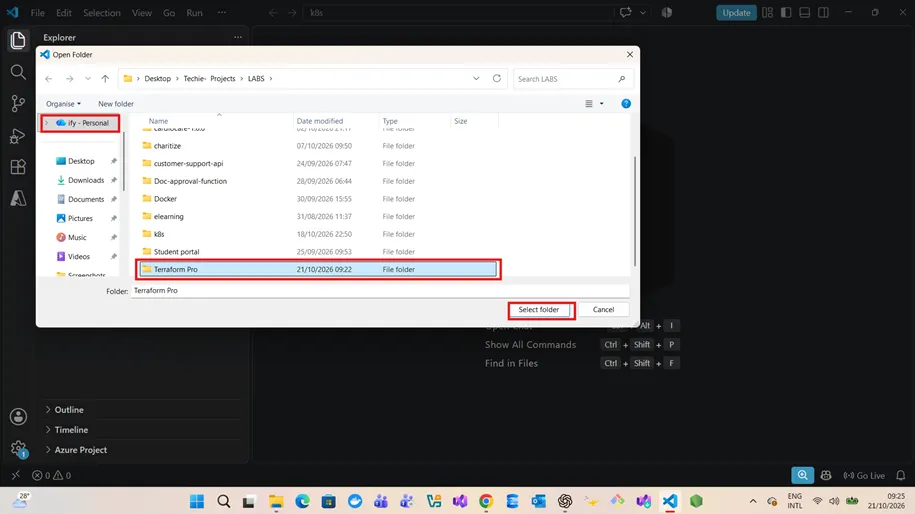
The screenshot shows the Windows folder-selection dialog inside the LABS directory. The Student portal folder is selected to be opened in VS Code. This establishes the project workspace where the Student Registration interface can be edited and tested.
Build the Registration Form

The screenshot shows index.html open in Visual Studio Code within the Student portal project. The form includes fields for Full Name, Email, and Course, with required inputs and a linked style.css file. This establishes the basic front-end structure for the Student Registration application.
Complete the HTML form structure

The screenshot shows the lower section of index.html with the Course dropdown and available options. The options include Cloud Engineering, DevOps Engineering, and Azure Administration, followed by the Register button. This completes the visible Student Registration form and prepares it for further application logic and database integration.

The screenshot shows the lower section of the Student Registration HTML form, including the course selection and Registered Students table. The Load Students button and table structure prepare the page to display records retrieved from the application.

The screenshot shows the general styling section of style.css for the Student Registration page. It defines the page layout, background, fonts, container size, spacing, and overall appearance.

The screenshot shows the form and input styling in style.css. The rules control the layout, labels, input fields, borders, spacing, and focus effects for a cleaner registration interface.

The screenshot shows the button styling section of style.css. It defines the appearance, hover effects, colors, spacing, and behavior of the registration and Load Students buttons.

The screenshot shows the table styling section of style.css. It formats the table width, header, cells, borders, spacing, and row appearance for displaying student records.

The screenshot shows the responsive design rules in style.css. These rules adjust the container, table, text size, and spacing so the registration page remains usable on smaller screens.

The screenshot shows script.js containing the front-end JavaScript logic for the Student Registration form. It collects the student name, email, and course and prepares the data for a POST request to the API.

The screenshot shows the remaining form submission logic in script.js. It processes the API response, displays a successful registration message, resets the form, and reports errors when the request fails.

The screenshot shows the VS Code context menu for index.html with the option to open the file using another method. This step provides access to options for running or viewing the Student Registration page.

The screenshot shows the VS Code Run menu with Run Without Debugging selected. This starts the application without attaching the debugger so the HTML page can be tested.

The screenshot shows the Student Registration page running in a web browser. The form displays Full Name, Email, Course options, the Load Students button, and the table header for registered students.

The screenshot shows the Azure Functions command palette in VS Code with Create New Project selected. This begins the process of creating the backend Azure Functions project for the Student Registration application.

The screenshot shows the folder selection dialog with the student-api folder selected. Selecting this folder sets the location where the Azure Functions backend project will be created.

The screenshot shows the Azure Functions project type selection with JavaScript selected. JavaScript is chosen as the programming language for the backend function project.

The screenshot shows the Azure Functions trigger selection with HTTP trigger highlighted. An HTTP trigger allows the Student Registration application to communicate with the backend through web requests.

The screenshot shows the function name field containing studentsdata. This name identifies the HTTP-triggered Azure Function that will handle student-related requests.

The screenshot shows the generated studentsdata Azure Function in VS Code. The function is configured for GET and POST requests and confirms that the JavaScript Azure Functions project was created successfully.

The screenshot shows the terminal running npm install mssql inside the student-api project. The command installs the SQL Server package required for the backend to communicate with the Azure SQL database.

The screenshot shows the completed Azure Functions project and the generated studentsdata HTTP trigger. The successful creation messages confirm that the JavaScript function project and HTTP trigger were initialized correctly.

The screenshot shows the student-api terminal after installing the mssql package. The installation completed successfully with packages added and no reported vulnerabilities.


Conclusion
The Student Registration project was successfully completed, integrating the front end, Azure Function API, and Azure SQL Database. Users can register students, securely store their information, and view registered records through a simple interface.