Stop Confusing Authentication, Authorization, and JWTs


Open up Postman or inspect an API client’s dropdown menu, and you’ll see a flat list: Basic Auth, Digest Auth, Bearer Token, OAuth 2.0, API Key and more.

It’s convenient UI design, but it has quietly caused a massive misunderstanding in software engineering. Developers routinely treat OAuth 2.0 as an authentication method, confuse the Bearer pattern with JSON Web Tokens (JWTs), and store refresh tokens in places that leave applications wide open to attack.
Let’s dismantle the confusion and walk through how modern authentication actually fits together.
1. AuthN vs. AuthZ: The First Line of Defense
Every security discussion starts with two distinct questions:
- Authentication (AuthN): Who are you?
- Authorization (AuthZ): What are you allowed to do?
When a request reaches your API gateway, authentication runs first. The client provides credentials, the server verifies identity, and if valid, permits entry. If identity cannot be confirmed, it halts immediately with a 401 Unauthorized.
Only once identity is proven does authorization take over to check permissions, returning 403 Forbidden if you attempt to touch resources outside your role.

2. The Legacy Foundations: Basic, Digest, and API Keys
Before modern token patterns took over, systems relied on simpler, server-dependent mechanisms:
- Basic Authentication: Sends the username and password encoded in Base64 within the
Authorizationheader (Basic <base64>). Because Base64 is reversible encoding—not encryption, it is vulnerable unless wrapped strictly in TLS/HTTPS. Sending raw credentials on every single API request makes it obsolete for production apps today. - Digest Authentication: An iterative improvement that hashes credentials using MD5. While it avoids sending plain text over the wire, MD5 is cryptographically weak, and modern token standards have rendered Digest legacy.
- API Keys: A unique random string passed in headers (like
X-API-Key). They remain standard for server-to-server communication, but they carry distinct limitations: They are opaque strings — the server must query a database or cache on every call to verify ownership and permissions. They typically lack built-in expiration, making leaked keys an open-ended vulnerability until manually revoked.

3. Stateful Sessions vs. Stateless Tokens
Session-based authentication
- The user posts credentials.
- The server creates a session record in memory or a database (such as Redis) and assigns a unique
Session ID. - The server sets an
HttpOnlycookie containing theSession IDon the browser. - On every subsequent request, the cookie is sent automatically, and the server queries its store to retrieve session data.
The Trade-off: Sessions provide immediate revocation — delete the session from Redis, and the user is instantly logged out. However, they are stateful. As services scale horizontally across distributed microservices, centralized session storage can become a performance and availability bottleneck.
Token-based authentication
- Bearer Authentication: This is not a token format; it is an HTTP authentication scheme. It simply defines an agreement: “Whoever bears this credential is granted access.”
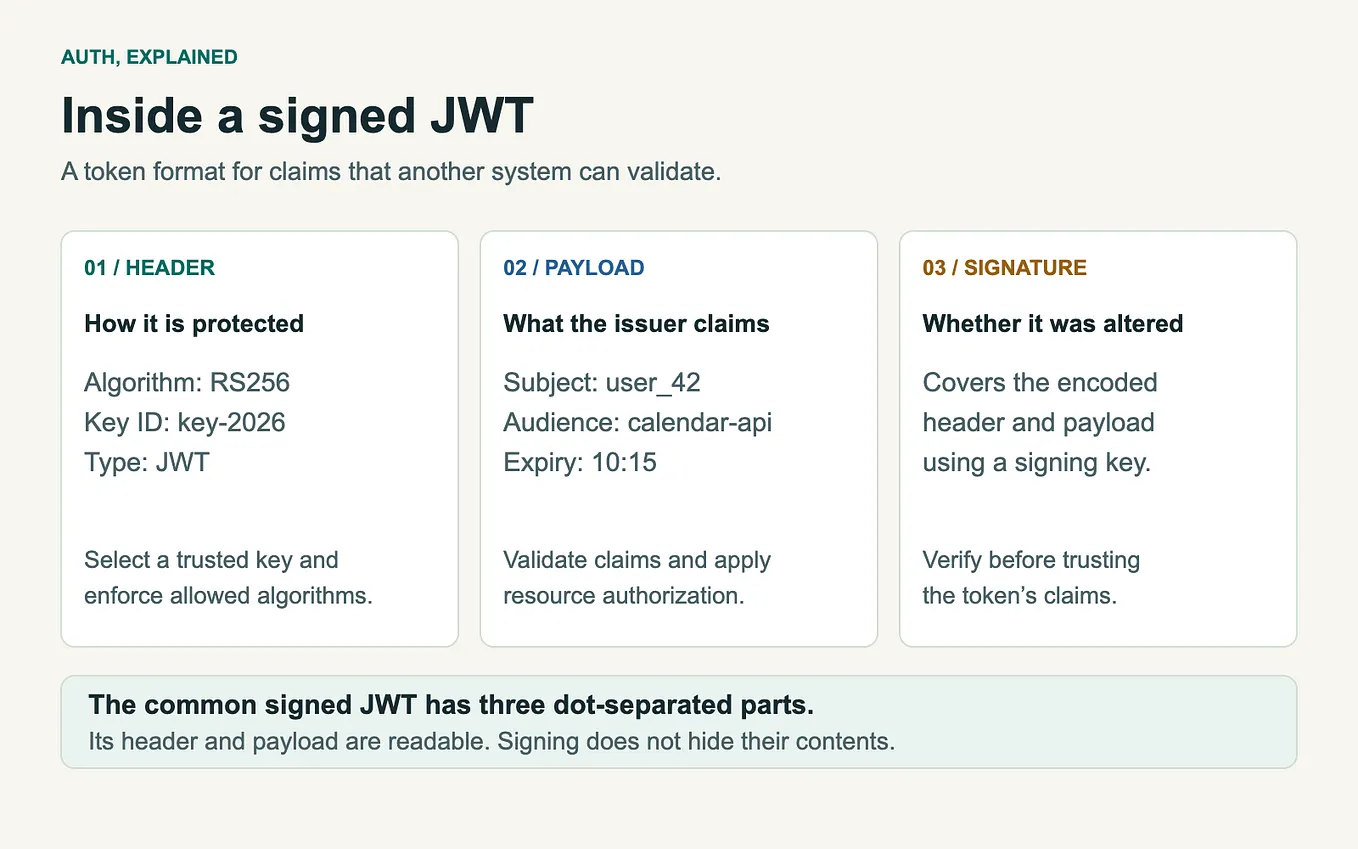
- JSON Web Tokens (JWT): A compact, URL-safe means of representing claims between two parties. A JWT consists of three base64url-encoded parts: Header, Payload, and Signature.
Because the JWT is cryptographically signed (via HMAC or asymmetric keys like RS256), a backend service can verify its authenticity statelessly by inspecting the signature and expiration timestamp. No database lookup is needed for everyday API calls.

4. Why You Need Two Tokens: Access vs. Refresh
Stateless JWTs create an operational problem: revocation. If a JWT is valid for 24 hours and gets stolen, an attacker has an open door for an entire day, and the server cannot invalidate it without introducing a stateful blacklist.
Get Lasitha Amarasinghe’s stories in your inbox
Join Medium for free to get updates from this writer.
To balance performance with security, modern systems split responsibilities:

If an access token is intercepted, the attacker’s window of opportunity is limited to minutes. When it expires, the client uses the long-lived refresh token to request a new pair.
Unlike access tokens, refresh tokens are stateful and tightly restricted. They are persisted in a database or Redis store, allowing the server to revoke a user’s entire session immediately if suspicious behavior or a password change occurs. Because they are only sent to a single authorization endpoint (/auth/refresh) rather than on every standard API call, their exposure surface over the network is minimal.

Where to Store Tokens
Never store sensitive tokens in browser localStorage or sessionStorage. Any Cross-Site Scripting (XSS) vulnerability allows an attacker to inject JavaScript, read the storage API, and exfiltrate credentials. Instead:
- Keep the access token in application memory (e.g., inside client-side runtime state).
- Store the refresh token in an
HttpOnly,Secure,SameSitecookie.
The HttpOnly flag ensures the cookie cannot be read by JavaScript, shutting down browser-based token theft. Pairing this with SameSite=Strict protects against Cross-Site Request Forgery (CSRF).
5. Untangling OAuth 2.0 and OpenID Connect
Two terms frequently misused interchangeably are OAuth 2.0 and OpenID Connect:
OAuth 2.0 is for Authorization, Not Authentication
OAuth 2.0 was designed to allow third-party applications to access resources on a user’s behalf without knowing their password.
Example: You connect a third-party photo-printing app to your Google Drive. You grant permission, Google issues an Access Token to the app, and the app reads your files.
That access token represents delegated authority. It does not explain who you are; it simply proves that the holder has permission to read files from that specific Google Drive account.
OpenID Connect Adds the Identity Layer
Because developers kept misusing OAuth 2.0 access tokens for user logins, the OpenID Connect (OIDC) specification was built directly on top of OAuth 2.0.
In an OIDC flow (e.g., “Sign in with Google”):
- The user logs in and consents.
- The identity provider returns both an Access Token (OAuth 2.0 authorization) and an ID Token (OIDC authentication).
- The ID Token is a signed JWT containing profile claims:
sub(unique user ID),email,name, and issuance timestamps.
Your application verifies the ID token’s signature to immediately establish the user’s identity.
6. Single Sign-On (SSO): The Experience vs. The Engine
Developers often talk about SSO as if it were a security protocol. In reality, Single Sign-On is a user experience pattern, not an authentication algorithm.
Its promise is simple: sign in once with a central Identity Provider (IdP), and move seamlessly across multiple separate apps without entering your password again — the exact experience of logging into Google once and unlocking Gmail, YouTube, and Drive.
To make that seamless handoff possible, the Identity Provider relies on standardized protocols under the hood:
- OpenID Connect (OIDC): The standard for modern consumer and cloud apps. Because it provides the signed ID tokens we covered earlier, apps can safely inherit your verified session from the IdP.
- SAML (Security Assertion Markup Language): The enterprise workhorse. It uses structured XML assertions to share trust between organizations and tools. While heavier and older than OIDC, it remains the backbone of corporate IT, internal dashboards, and enterprise tools like Okta or Salesforce.
Let’s meet again with another article soon.