JCL 1: Your First Job, Step by Step

In the last post I told you what I’ve been building. Now let’s actually use it.
This is the first tutorial in a series that walks through Mainframe development the way it should be taught: by writing jobs, running them, and seeing exactly what happens. No 3270 terminal, no access to a real Mainframe required — every example below is 100% runnable on MRE, right now.
Let’s start with the basics.
What is a JOB?
A JOB is the basic unit of work in the Mainframe world. It’s a set of instructions — written in JCL (Job Control Language) — that tell the system: “run this program, feed it this data, put the output here.” Every JOB can have one or more steps, and each step runs a different program.
Think of JCL as the “Dockerfile” of the Mainframe world: it’s not the program itself, it’s the recipe that orchestrates how everything runs.
Let’s see that recipe in its simplest form.
1. Your First JOB: Hello World
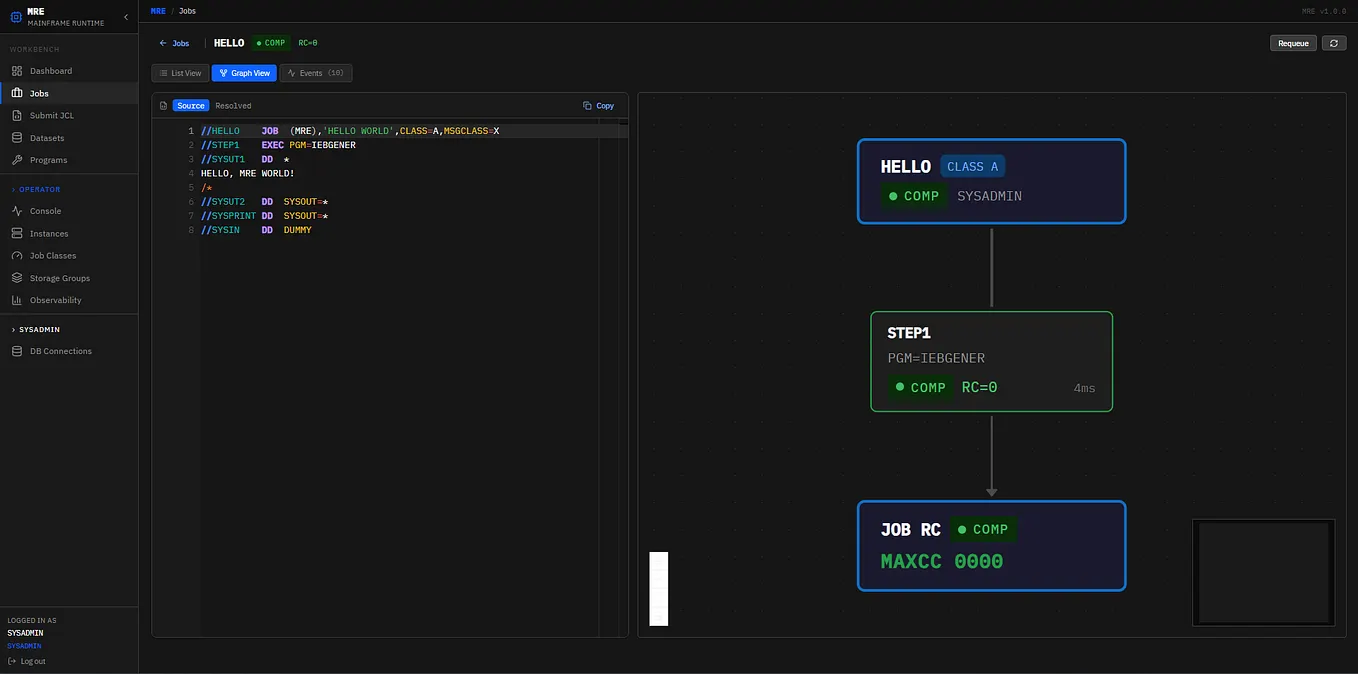
//HELLO    JOB  (MRE),'HELLO WORLD',CLASS=A,MSGCLASS=X
//STEP1    EXEC PGM=IEBGENER
//SYSUT1   DD  *
HELLO, MRE WORLD!
/*
//SYSUT2   DD  SYSOUT=*
//SYSPRINT DD  SYSOUT=*
//SYSIN    DD  DUMMY
Let’s break this down line by line, because every symbol here has a purpose:
//HELLO JOB (MRE),'HELLO WORLD',...— declares the JOB.HELLOis the name;(MRE)is accounting information;CLASS=Asays which execution queue it runs in;MSGCLASS=Xcontrols where the system log goes.//STEP1 EXEC PGM=IEBGENER— the first (and only) step.IEBGENERis a classic Mainframe utility program: it copies whatever it receives onSYSUT1toSYSUT2. It's essentially thecpof the z/OS world.//SYSUT1 DD *— this says the input data is inline, written directly into the JCL (that's what the*means). The textHELLO, MRE WORLD!is the content.//SYSUT2 DD SYSOUT=*— the output goes to the spool (the system's print/log output), not to a persistent file.
Run this JOB and the spool shows: HELLO, MRE WORLD!. Your first job just completed successfully (RC=0, the return code confirming everything went fine).

It’s deliberately simple. But you just saw the four elements you’ll use in every JOB you write from here on: the JOB card, the EXEC, and the DD statements that connect input and output data.
2. Creating a Persistent Dataset
The example above didn’t leave anything behind — the output went to the spool and that was it. Now let’s create a dataset, the Mainframe equivalent of a file, but catalogued and persistent in the system.
//NEWDS    JOB  (MRE),'NEW DATASET',CLASS=A,MSGCLASS=X
//STEP1    EXEC PGM=IEBGENER
//SYSUT1   DD  *
RECORD 1
RECORD 2
RECORD 3
/*
//SYSUT2   DD  DSN=MY.TEST.FILE,DISP=(NEW,CATLG),
//             DCB=(RECFM=FB,LRECL=80,BLKSIZE=0)
//SYSPRINT DD  SYSOUT=*
//SYSIN    DD  DUMMY
The key difference is in SYSUT2:
DSN=MY.TEST.FILE— the dataset name. On a Mainframe, names are uppercase and dot-separated, like a hierarchical namespace.DISP=(NEW,CATLG)— this is the heart of JCL.DISP(disposition) tells the system what to do with the dataset.NEWmeans "this doesn't exist yet, create it."CATLGmeans "and when the step finishes, leave it catalogued" — persistent, available to other jobs.DCB=(RECFM=FB,LRECL=80,BLKSIZE=0)— describes the physical format of the file:RECFM=FB(fixed-length, blocked records),LRECL=80(80 bytes per record — the classic punch-card width, still alive 60 years later),BLKSIZE=0(let the system pick the optimal block size).
After this job runs, MY.TEST.FILE exists in the system catalog with three records. It didn't disappear when the job ended — this is where the Mainframe world starts to feel different: every dataset you create lives in a central catalog, visible to any job that needs it.


3. Reading What Already Exists
Now that MY.TEST.FILE exists, how do you read it from another job?
//READDS   JOB  (MRE),'READ DATASET',CLASS=A,MSGCLASS=X
//STEP1    EXEC PGM=IEBGENER
//SYSUT1   DD  DSN=MY.TEST.FILE,DISP=SHR,LRECL=80
//SYSUT2   DD  SYSOUT=*
//SYSPRINT DD  SYSOUT=*
//SYSIN    DD  DUMMY
Here DISP=SHR means "shared": the dataset already exists, you're not creating it, and you're willing to share read access with other jobs reading it at the same time. It's the right disposition whenever you just need to look at data without locking anyone else out.
Get MainframeLATAM’s stories in your inbox
Join Medium for free to get updates from this writer.
The result in the spool: the same RECORD 1, RECORD 2, RECORD 3 we saved in the previous step, copied back out.

4. Adding Data Without Destroying What’s Already There
Last piece of this first lesson: what if you want to append records to a dataset that already exists, without wiping out what was already in it?
//APPEND   JOB  (MRE),'APPEND',CLASS=A,MSGCLASS=X
//STEP1    EXEC PGM=IEBGENER
//SYSUT1   DD  *
APPENDED LINE 1
APPENDED LINE 2
/*
//SYSUT2   DD  DSN=MY.TEST.FILE,DISP=MOD,LRECL=80
//SYSPRINT DD  SYSOUT=*
//SYSIN    DD  DUMMY
DISP=MOD is the third disposition you need to know: it means "modify" — if the dataset exists, append to the end; if it doesn't, create it (it behaves like NEW in that case). After this job, MY.TEST.FILE has five records: the original three plus the two new lines.

The Pattern You Just Learned
NEW,CATLG → SHR → MOD. That's the full lifecycle of a dataset on a Mainframe, and it's the pattern you'll see over and over. Once this cycle clicks, 80% of the logic in any JCL job stops being mysterious and starts being predictable.
Nothing you ran in this post was pseudocode or a conceptual simulation — it’s real JCL, with the exact syntax that would run on a production z/OS system. The difference is you ran it in Docker, on your own machine, without needing access to a real Mainframe (which, let’s be honest, almost nobody has for practice).
That’s exactly what MRE is for: an environment where you can write real JCL, run it, break it, fix it, and learn the full cycle — without the barrier being “get access to a Mainframe” in the first place.
Have you written JCL before, or is this your first time seeing this language? Tell me in the comments — and if you haven’t joined the early-access list yet, [leave your email here] to get in when the next spots open up.
This is the first tutorial in a series on JCL and Mainframe development. Next up: PDS — how to organize code and data into libraries.
#Mainframe #JCL #COBOL #Docker #SoftwareEngineering #zOS