[LAB] Microsoft Active Directory (MSAD) Hybrid Setup in AWS (August 2025)

AWS posted a blog on August 1st 2025, about its new service for extending AD directories into the cloud. We are going to test that feature and have crucial understanding for some future requirements.
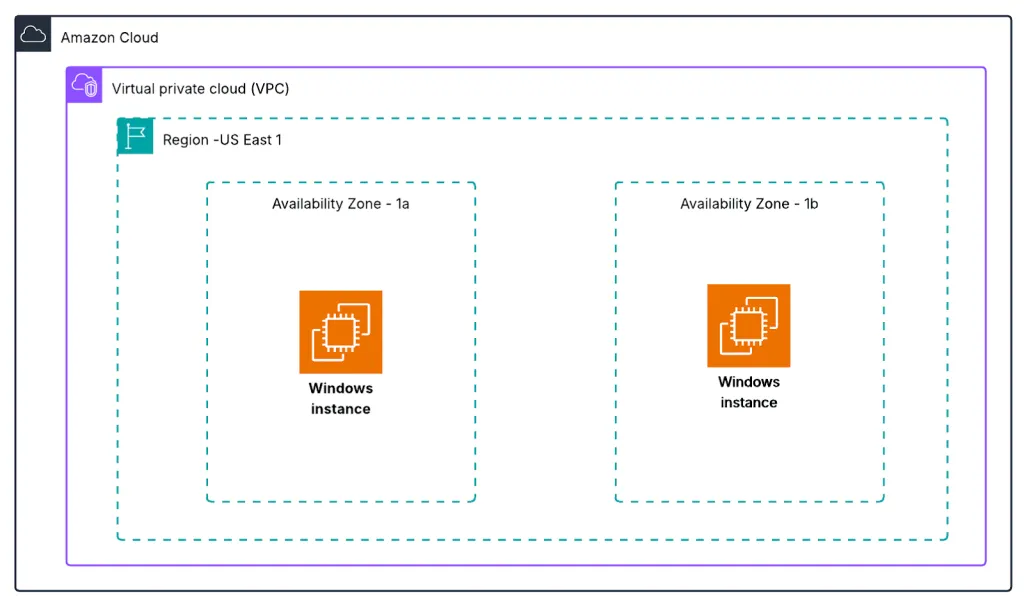
Due to us not having access to on-prem Infrastructure we are going to replicate the on prem characteristics on the AWS cloud (Same account, different VPC and two subnets for 2 domain controllers). This lab is directly referenced from the official AWS documentation (the blog that we mentioned) that provides 2 architectures for AD extension. We are following the scenario where Domain Controllers are owned by customers. The lab environment is a trial for replicating this scenario at best.
Though this documentation will cover brief steps, reports, prechecks etc, there are some must have prerequisites that are necessary to create a Hybrid Edition directory (Referenced from the blog itself):
- Connectivity between the self-managed Active Directory network and the AWS account where Hybrid Directory is being created.
- Critical: The existing Active Directory Forest must have at least two domain controllers. For testing, follow the steps in AWS Launch Wizard to deploy a self-managed AD Forest on Amazon EC2.
- The Active Directory must be a single forest, single domain, in our case we will only have a single domain.
- Complete a directory assessment of your self-managed domain controllers before extending to AWS Managed Microsoft AD (Hybrid Edition). This assessment verifies that your self-managed Active Directory environment meets the requirements to extend your domain.
- AWS Secrets Manager secret that stores credentials of a user account with administrator permissions in your self-managed AD. These credentials will only be used during the creation of Hybrid directory and will not be stored. Critical note: when creating the secret, the Secret Keys must be “customerAdAdminDomainUsername” and “customerAdAdminDomainPassword”, corresponding to the AD username and password respectively.
Some of our own Findings includes:
This is our on- prem structure, named as On Prem VPC
The vpc is named on prem vpc with 2 Public Subnets, although the Subnet name is pvt, we decided for it to be public, taking a shortcut to some issues.
The Route Table for On Prem VPC.

The pcx-04ceca44e8033a32e is a VPC Peering connection between the On prem VPC and the
AD Migration Peering VPC.
Details for AD Migration Peering VPC

Route table:
I have two of these instances setup:

Both of these are using the same security group:
The 3rd inbound rule is a self referential rule that allows all traffic to flow through the instances that are using this security group.
AD Setup in the EC2 instances:
Headover to the Server Manager:
In manage, top right, click on add roles and features:
Role/feature based installation:
Server selection:
Add the AD Domain services and Click on install features, Click next:

No other configuration necessary for our case, head over to confirmation by clicking next:

Hit install
An exclamation pops up on the top nav bar, to promote it to the domain controller, click on that
Add a new domain as a domain controller:

Forests functional level should be kept as latest as possible for compatibility, set a recovery password too :
Leave the DNS Option as it is.
Set the net bios name:
It’s a good practice to leave the log path to default for future diagnosis:
Pre-requisites check might through some warning but have no worries:
Then you just hit install, it may ask for a restart and that’s completely fine. The user also might have been changed to <netBIOS name>/Administrator.
— This Concludes our setup for Primary Domain Controller —
Before Setting Up another Domain Controller, We first have to Setup our Primary AD with some temporary data. This is tedious hence we opted for writing scripts. The script automates the process for making OU and dummy data so we can be sure the second domain controller is in sync with the first one.
This scripts 3 OUs named Sales, Engineering and HR.
Warning ! This script is crafted for the domain genese.internal. Use caution if you’re running some other domain.
Import-Module ActiveDirectory# Configurable domain suffix$UPNSuffix = "genese.internal"# Log file$LogFile = "C:\Temp\AD_User_Creation_Log.csv"if (-not (Test-Path "C:\Temp")) { New-Item -ItemType Directory -Path "C:\Temp" | Out-Null }"SamAccountName,FullName,UserPrincipalName,Department,Password" | Out-File -FilePath $LogFile -Encoding UTF8# Sample first and last names$FirstNames = @("John","Alice","Robert","Sophia","David","Maria","James","Linda","Michael","Karen","Daniel","Emma","William","Olivia","Ethan","Ava","Liam","Isabella","Noah","Mia")$LastNames = @("Doe","Smith","Johnson","Williams","Brown","Jones","Miller","Davis","Garcia","Rodriguez","Martinez","Hernandez","Lopez","Gonzalez","Wilson","Anderson","Thomas","Taylor","Moore","Jackson","White","Harris","Martin","Thompson","Patel","Singh","Shah","Gupta","Khan")# Department structure$departments = @(@{ Name = "HR"; Group = "HR_Staff"; UserCount = 15; CompCount = 10 },@{ Name = "Sales"; Group = "Sales_Staff"; UserCount = 15; CompCount = 10 },@{ Name = "Engineering"; Group = "Engineering_Staff"; UserCount = 20; CompCount = 15 })# --- Ensure Root Groups OU exists ---if (-not (Get-ADOrganizationalUnit -LDAPFilter "(ou=Groups)" -ErrorAction SilentlyContinue)) {New-ADOrganizationalUnit -Name "Groups" -Path "DC=genese,DC=internal"Write-Host "Created root OU: Groups"}# Bulk create users and computers per departmentforeach ($dept in $departments) {# --- Ensure Department OU Structure ---$deptOU = "OU=$($dept.Name),DC=genese,DC=internal"if (-not (Get-ADOrganizationalUnit -LDAPFilter "(ou=$($dept.Name))" -ErrorAction SilentlyContinue)) {New-ADOrganizationalUnit -Name $dept.Name -Path "DC=genese,DC=internal"Write-Host "Created department OU: $($dept.Name)"}$userOU = "OU=Users,OU=$($dept.Name),DC=genese,DC=internal"if (-not (Get-ADOrganizationalUnit -LDAPFilter "(ou=Users)" -SearchBase $deptOU -ErrorAction SilentlyContinue)) {New-ADOrganizationalUnit -Name "Users" -Path $deptOUWrite-Host "Created OU: Users under $($dept.Name)"}$compOU = "OU=Computers,OU=$($dept.Name),DC=genese,DC=internal"if (-not (Get-ADOrganizationalUnit -LDAPFilter "(ou=Computers)" -SearchBase $deptOU -ErrorAction SilentlyContinue)) {New-ADOrganizationalUnit -Name "Computers" -Path $deptOUWrite-Host "Created OU: Computers under $($dept.Name)"}# --- Ensure Group Exists ---if (-not (Get-ADGroup -Identity $dept.Group -ErrorAction SilentlyContinue)) {New-ADGroup -Name $dept.Group -GroupScope Global -Path "OU=Groups,DC=genese,DC=internal"Write-Host "Created missing group $($dept.Group)"}# --- Create Users ---for ($i = 1; $i -le $dept.UserCount; $i++) {$FirstName = Get-Random -InputObject $FirstNames$LastName = Get-Random -InputObject $LastNames# Username format: first initial + lastname$SamAccountName = ($FirstName.Substring(0,1) + $LastName).ToLower()# Ensure uniqueness$counter = 1while (Get-ADUser -LDAPFilter "(sAMAccountName=$SamAccountName)" -ErrorAction SilentlyContinue) {$SamAccountName = ($FirstName.Substring(0,1) + $LastName + $counter).ToLower()$counter++}$UserPrincipalName = "$SamAccountName@$UPNSuffix"$PasswordPlain = "Genese@1234"$Password = (ConvertTo-SecureString $PasswordPlain -AsPlainText -Force)# Create the user$user = New-ADUser `-GivenName $FirstName `-Surname $LastName `-SamAccountName $SamAccountName `-UserPrincipalName $UserPrincipalName `-Name "$FirstName $LastName" `-Path $userOU `-AccountPassword $Password `-Enabled $true `-ChangePasswordAtLogon $false `-PassThruWrite-Host "Created user: $SamAccountName ($FirstName $LastName)"# Add to department groupAdd-ADGroupMember -Identity $dept.Group -Members $user# Log to CSV"$SamAccountName,$FirstName $LastName,$UserPrincipalName,$($dept.Name),$PasswordPlain" | Out-File -FilePath $LogFile -Append -Encoding UTF8}# --- Create Computers ---for ($j = 1; $j -le $dept.CompCount; $j++) {$CompName = "$($dept.Name)-PC{0:D3}" -f $jif (-not (Get-ADComputer -LDAPFilter "(Name=$CompName)" -ErrorAction SilentlyContinue)) {New-ADComputer -Name $CompName -Path $compOU -Enabled $trueWrite-Host "Created computer: $CompName"}else {Write-Host "Computer $CompName already exists"}}}Write-Host " Bulk creation completed. Log file saved to $LogFile"
The script throws some errors, that are supposed to be random check, but it works.
To check if the script has worked or not, head over to the Active Directory Users and Computers Application.
It should look something like this:
This is dummy data and does not serve any functional purpose, you can modify as you like.
Now our goal is to make the second domain controller for this domain.
First thing, We change the DNS.
Type Ethernet:

Change Adapter Options:

Click on the Ethernet:
Get Manoj’s stories in your inbox
Join Medium for free to get updates from this writer.
Then properties:
Then IPV4:

Now Change the DNS, Set preferred DNS to the Private IP of Primary Domain Controller. Then alternate DNS to the Loopback Address.
Now need to have a user with administrator credentials.
Head over to our newly created Domain controller and follow this sequence.
- Ping check — If you’ve done the network setup correctly, then the two instances should be able to ping each other. This is critical.
- Make credentials on the primary domain controller, Save the Username and Password immediately.

Add Policies:
Add to these groups:

Now Head over to the New Domain Controller, meaning the Second EC2 Instance


Now if the instances can ping each other it will ask for some credentials.
Yes, that’s right. We previously made a credential on our primary DC with the administrator policies. We use that credential.
Now it should throw a notification, welcoming on the workgroup.
This Concludes the Networking Setup.
Now, we setup the domain controller like we did with the primary domain controller.
Head over to the Server manager, do the steps until the promotion of domain controller,
Reference steps from the previous steps that we have done.
If that is finished, we now promote our instance to the secondary domain controller. Clear steps are described below:
We are making this as the second domain controller hence we opt for the option: Add a domain controller to an existing domain.
Now for the important part: Click on change credentials

For this operation of adding the second domain controller, we have to provide credentials that have administrator access to the primary domain controller instance.
Simply, It means that we have to provide the administrator credentials, one that was created during launch, through AWS Console.

Then Continue with the setup, just click next in our case.

If the steps are followed correctly then we can verify the just by heading to the Primary Domain Controller → Active Directory Users and Computers (We can see 2 PCs in Domain Controller folder)
Also check the integrity of records, The users and computer records have been synced to the primary domain controller.
— — — — — — End of the Phase — — — — — — — — — -
Phase 3: Migration Assessment, Migrating AD to AWS.
Before the migration, we have to again have a DNS setup.
So the requirement (In our simple case where the DC will be responsible for resolving DNS) is that the domain controllers have to point to each other for DNS resolving. Have a look at these two DNS setup for primary and secondary Domain Controller’s DNS Setup.
*** 127.0.0.1 is a loopback address.
They point at each other !
I took a long time to figure this one out. If the DNS are not pointed to each other, it fails the DC Health Check while doing the DC Assessment.
Now head over to Directory Services in AWS Console, choose Setup up Directory:
Choose the Extend Directory Option:
Now fill this form. Use the private Address of the EC2 instances for the DNS IP Address, Choose the empty VPC that we have set up.
Now hit Next.
Now an assessment will take place, spanning about 20 mins.
The assessment passed in my case.

Now click on the Click Hybrid Directory option:
Now, we have to choose a secret, we have to encrypt the secret with a customer managed key.
Here’s the article defining that.
This is Critical:
The field names should be very specific. Make the Secret type to others.

Then just hit Create Directory.
Congratulations ! Your Hybrid AD setup should be active now !