


Workflow lab: From design system to campaign in Figma Weave

Design systems can power more than just designs. This workflow shows you how to turn raw materials into brand campaign collateral using the Gen Effect and Figma nodes.
Share Workflow lab: From design system to campaign in Figma Weave
Hero illustration by Marine Buffard
Workflow fact sheet:
Figma products: Figma Weave, Figma Design, FigJam
Tools: Figma node, Image Describer node, Color Palette node, Gen Effect node, Any LLM node
Team: Product designer, brand copywriter
Question to solve: What if you could transform elements from a design system into on-brand marketing assets at speed?
Welcome to Workflow Lab, where we present a sample workflow Coding agents are reshaping how developers build, but they’re only as good as the input they’re given. This workflow explores how context keeps code and canvas in sync.Workflow lab: Moving between design and code with agents
A design system is typically built with product designers in mind, giving them guidance on everything from button states to layouts for different screen sizes. But brand designers use many of the same building blocks, including type, color, and layout, which they leverage for marketing assets like billboards or social media posts. Figma Weave To build upon a visual language with AI, you need to harness the logic behind each prompt—building, editing, and directing how visuals come to life. Here, we share five creative workflows that show the breadth of what the Figma Weave canvas can do.

Turning prompts into five scalable workflows with Figma Weave
In this example workflow, a product designer at the Museum of Speculative Futures (MOSF), a fictional museum exploring how culture imagines what comes next, uses Weave to bring elements from the museum’s design system into a campaign promoting the exhibition. Follow along as they transform type, color, and layouts from their product designs into expressive collateral and create a repeatable workflow the team can reuse.
The problem
A few weeks before a new exhibition launch, Tomorrow Rehearsed, MOSF’s brand designer is out on unexpected leave. Instead of hiring an agency or a temporary backfill, one of the product designers with a deep appreciation for brand design offers to take over the project to keep the ball rolling. They know MOSF’s design system inside and out, but they’ve never used that system to create assets for a promotional campaign.
The Tomorrow Rehearsed exhibition imagines a future where nature can thrive undisturbed. One installation displays grass growing on the steps at a train station concourse. Another features a bench that has become a planter and a drinking fountain furred with moss. The designer needs to capture that mood across all the exhibition collateral without giving too much of the exhibition away.
Rather than start from scratch, the designer brings familiar references—including the design system—from Figma Design into Figma Weave: existing text layouts, the museum’s color palette, and typography. They use those references to explore how MOSF’s existing visual language can express the exhibition’s mood, then carry that direction across three assets at different scales: a poster, billboard, and social media posts.


Building on what already exists
The Figma node
The Figma node brings a Figma frame onto the Weave canvas. Copy a frame in Figma Design, paste it into Weave, and the node appears. The Figma node stays connected, so any change in Figma Design shows up in Weave.
Weave tip: Give every reference a job
Tell Weave which references should guide layout, color, and type, rather than leaving it to infer their roles. The same logic applies to color: describing each color family separately gives Weave clearer guidance than asking one node to cover the whole palette.
To get started on the campaign, the designer gathers examples of MOSF’s existing designs and colors to guide the new work. They copy relevant frames from Figma Design and paste them onto the Weave canvas.
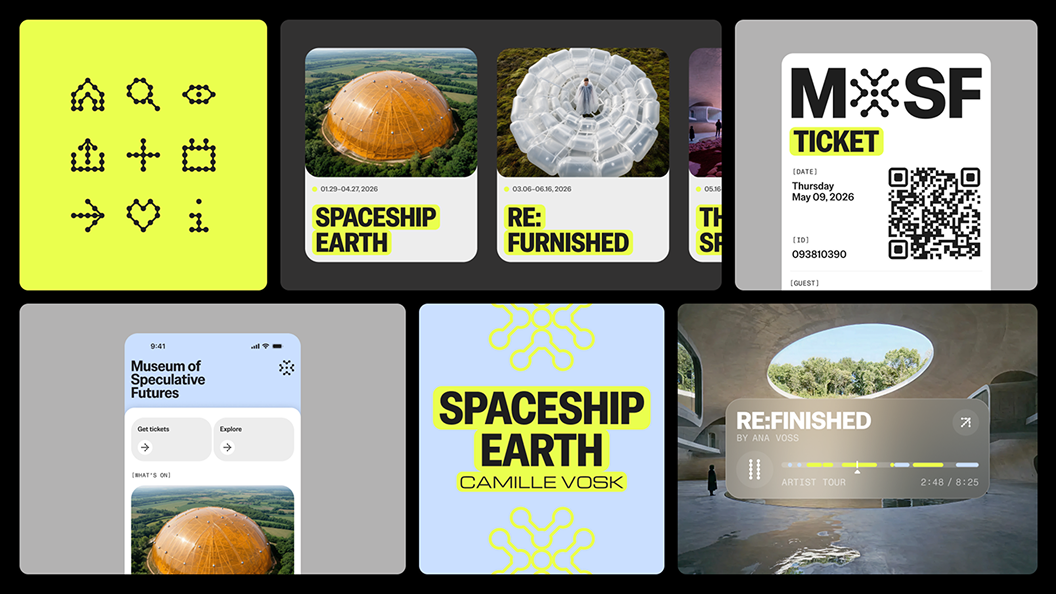
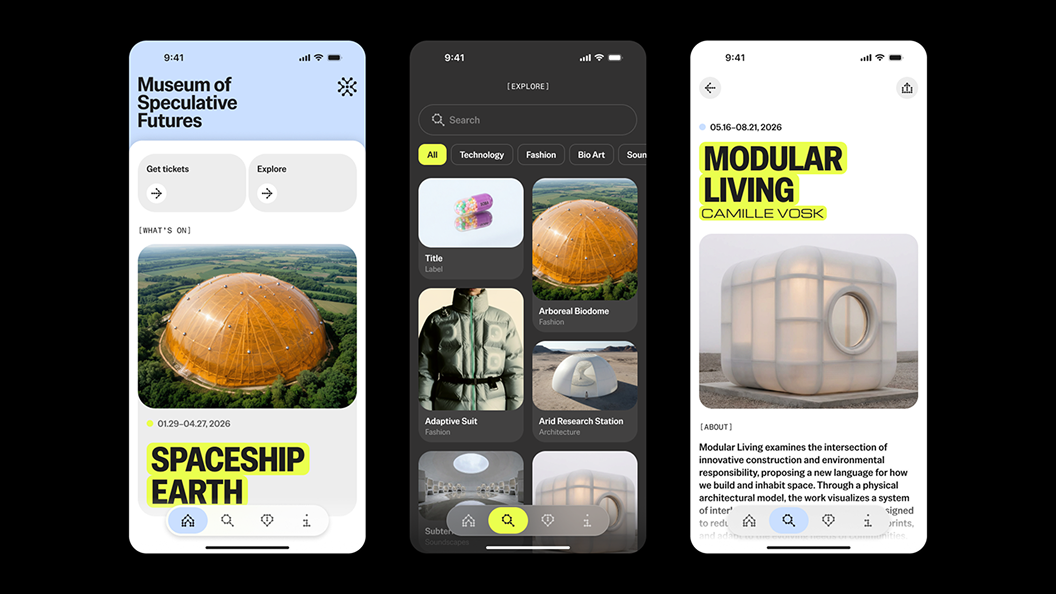
Next, the designer uses an Image Describer node to analyze visual references from those designs, including iconography, exhibition cards, and app screens. They ask it to look at which colors dominate, which are used as accents, and how layouts change when they include a photo background instead of solid color background. What comes back is a description of how the existing designs use color, accents, photography, and type.
Try it yourself: Use the Image describer as a mirror
Paste a layout frame and a swatch frame onto the Weave canvas as Figma nodes, connect both to an Image Describer, and see how the describer reads your brand.
The designer also adds the museum’s full color palette to a separate Color palette node. Three more Image Describer nodes then examine its color families: gray, yellow-orange, and blue. Each describes how the colors change across that family’s range. The yellow-orange shifts toward acid yellow-green as it lightens, rather than fading to pale yellow. The grays get dark but never reach black. The blues stay muted, closer to slate than primary blue. Together with the earlier description of MOSF’s existing designs, these three color descriptions give the rest of the workflow a guide for generating campaign images.




Creating a signature look
Weave tip: Explore different results
The Gen Effect node returns something slightly different every time you run it, so the effect you land on is specific to your campaign. Generate a few versions and keep the one that fits.
With that guidance in place, the designer starts making the campaign images. They upload the photographs of the exhibition installations—the steps, bench, and drinking fountain—to the Weave canvas and connect the images to the Image Describer node. The node then sends each subject through the same image-making setup, including the color, layout, and typographic rules established earlier, so every campaign image builds on a consistent foundation.
Try it yourself: Run the same description three times
Send one effect description through the Gen Effect node three times and compare what comes back. Apply your pick across a full set of images to see whether it holds up as a signature.
The designer extracts elements from the photographs and builds abstract visuals for the exhibition collateral. They land on two images: a concrete cube floating mid-air and overgrown with moss, and a close crop of moss and blue flowers pushing through cracked concrete. From there the designer plays around with different visual effects to push the campaign photography somewhere more expressive, while keeping the imagery recognizably MOSF.
Using the Gen Effect node, the designer describes the effects they want in plain language, and Weave creates a shift in color grading and a hazy blur around the edges of each image. Every asset passes through the same node, giving the full campaign a shared visual signature. The designer can adjust the effect and apply it to new images without recreating the work underneath.
Extending the design across formats and languages
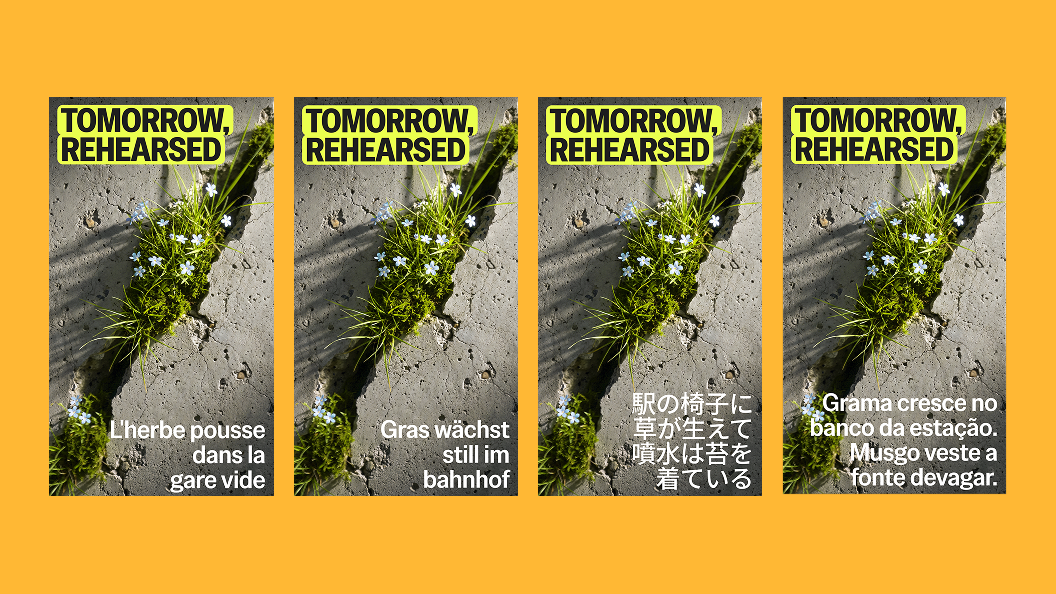
Once the effect is applied, the designer uses the Figma node to send each image into a frame in the Figma Design file, where it gets transformed into different compositions and layered with editable text frames. From there, the designer expands the background visuals into different formats. They start with the poster and billboard, using the floating cube image as the background and positioning the typography. With the print assets locked, they move on to the social posts, using a tighter crop of the cracked-concrete image as the background.
Social assets also need to run in four other markets—French, German, Japanese, and Portuguese. Back in Weave, each language gets its own Any LLM node, set up with guidelines the MOSF copywriter wrote for that market. The designer pastes the English concept line into the prompt box, and each node returns a version that’s culturally relevant, on brand, and shaped to the layout, with the line breaks in the right places.
Then the social posts return to the Figma Design file through the Figma node. Each localized version lands in its own frame, the type remains editable text, and the designer makes any final composition tweaks that need direct manipulation. With all three formats built, the work moves into a FigJam file for a campaign design crit.




Path to production: Making the workflow reusable
Weave tip: Publishing Weave tools
Publishing your workflows as a Weave tool on Figma Community is another way to share your work. The subject stays open as an input while the workflow structure remains consistent, so anyone can run it.
Every output in this workflow is specific to this exhibition, but the structure is reusable. The node graph reads whatever references it’s pointed at, so when the brand designer returns they can reuse it to make tweaks or create other assets for the rest of this exhibition’s collateral and other shows that follow.
And because the Figma nodes stay connected, the designs stay current. When the design systems team ships a new color token or updates a type style, the frame updates in Figma, the node updates in Weave, and the baseline reruns. A design system that changes should change everything downstream of it, and the Figma node makes keeping all that work in sync much easier.
The MOSF brand designer inherits a live campaign and a node graph they can keep improving as the exhibition evolves, making it easy to iterate on the project over time.
Want to create your own installations for the fictional Tomorrow Rehearsed exhibition? Try the MOSF tool and build out a collection of your own. Describe your object with a prompt, choose light or dark mode, and bring your ideas to life.
Visit Weave’s help center to learn more about the Figma node, Gen Effect node, and how to get started with Weave.