A digital signature in MS Word is an electronic, certificate-based seal that verifies the authenticity, integrity, and security of a document, ensuring it hasn’t been altered after signing and is legally recognized in many jurisdictions.
Steps to Digitally Sign a Word Document
Here are the steps to sign your documents digitally:
Step 1: Open the Document
Launch Microsoft Word and open the document you want to digitally sign. Ensure all content is finalized, as changes made after signing may invalidate the signature.

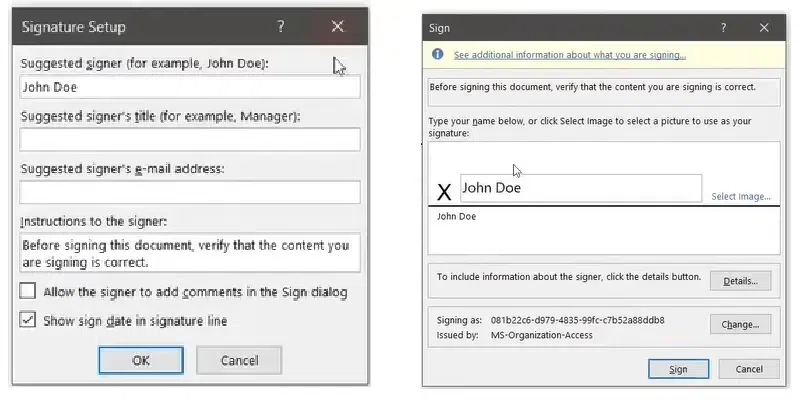
Step 2: Insert a Signature Line
To create a placeholder for the digital signature: Click on the Insert tab in the toolbar. Select Text and then click Signature Line > Microsoft Office Signature Line. In the popup window, fill in the signer’s information (e.g., name, title, and email). Click OK to insert the signature line into the document.

Step 3: Add the Digital Signature
Once the signature line is added: Double-click on the signature line in the document. A Sign window will appear. Type your name or upload a scanned image of your handwritten signature. Select your digital certificate by clicking Select Image or Use a Digital ID.
Step 4: Finalize the Digital Signature
Click Sign to finalize the digital signature. Word will add the signature and display a notification that the document is now signed and saved.

Step 5: Right-Click on the Signature (If Needed)
Hover over the signature line and right-click on it. From the context menu, select Remove Signature.
Note: If the Remove Signature option is not available, it may indicate restricted permissions. Ensure you have the necessary access to modify the document.
Steps to Add an Invisible Digital Signature
Adding an invisible digital signature in Microsoft Word allows you to secure your document without displaying a visible signature line. Follow these steps:
Step 1: Open Your Document
Launch Microsoft Word and open the document you want to secure with an invisible digital signature.
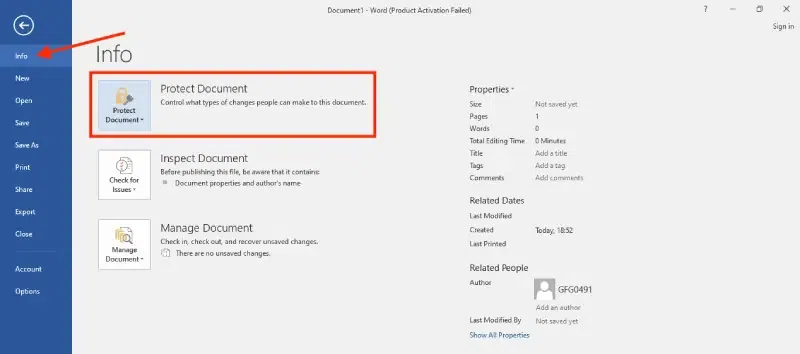
Step 2: Access the Protect Document Option
Click on the File tab in the top menu. Select Info from the sidebar. Click on Protect Document to reveal a dropdown menu.
Step 3: Choose to Add a Digital Signature
From the dropdown menu, select Add a Digital Signature. A dialog box will appear, prompting you to set up or select a digital signature.

Step 4: Select or Create a Digital Certificate
If you already have a digital certificate:
- Select your certificate from the list and proceed.
If you don’t have one:
- Follow the on-screen prompts to create a new digital certificate. Word may direct you to a third-party certificate provider or help you generate a basic self-signed certificate.
Step 5: Sign the Document
After selecting or creating your digital certificate, click Sign to add the invisible digital signature. The signature will be applied to the document, and a notification will confirm the action.
Note: Adding an invisible digital signature doesn’t display a signature line but ensures the document is verified and secure. A signature notification will appear when the document is viewed.
Step 6: Save the Document
To finalize the process, save the document:
- Click File > Save or use the shortcut Ctrl + S (Windows) / Cmd + S (Mac)