Mail Merge in MS Word is a feature that helps create multiple personalized documents—such as letters, invitations, or emails—by automatically inserting data from a source into a template, saving time and reducing manual work.
Steps to Mail Merge in MS Word
Here are the steps to perform a mail merge in MS Word and personalize mass letters by linking your document to a data source.
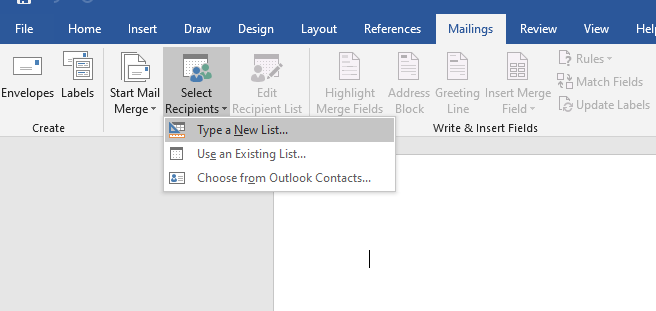
Step 1: Create a New Address List
Open MS Word and navigate to the Mailings tab. Then, click on the Start Mail Merge group, select the Select Recipients button, and choose Type New List. This will allow you to create a new address list for your mail merge.
Step 2: Enter Data in the "New Address List" Dialog
A dialog named "New Address List" will appear. Enter the desired data under the given headings. To add a new record, click on the New Entry button at the bottom of the dialog, and then click OK when you are done.

Step 3: Prepare the Master Letter
The next step is to prepare your master letter for use in the mail merge. Before entering the letter text, link the Word document to your list of names. Create a blank Word document, then go to the Mailings tab, click the Start Mail Merge group, and select Start Mail Merge → Letters.

Step 4: Link the Master Letter to the Existing List
Click the Mailings tab, navigate to the Start Mail Merge group, and select the Select Recipients button. Then choose the Use Existing List command to link your master letter to the existing address list.

Step 5: Start Typing the Letter and Insert Merge Fields
Begin typing the letter content. To add the name, address, and other details for the people on the list, go to the Mailings tab and, in the Write & Insert Fields group, click the Insert Merge Field button. A dropdown will appear showing all the table headings. Choose Title, then press the spacebar to create a space.
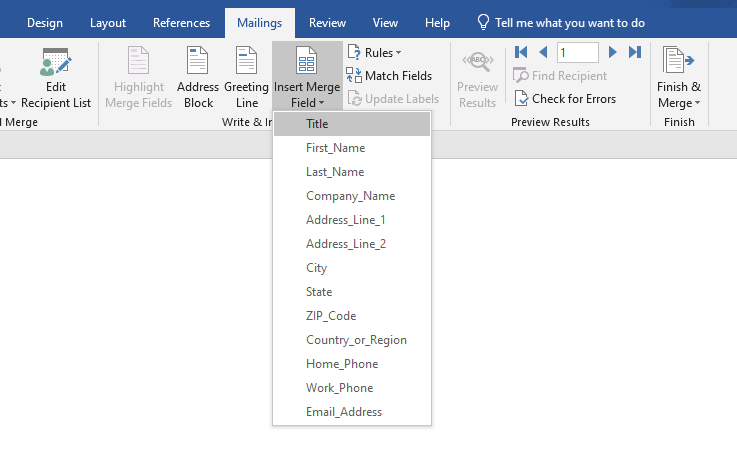
Step 6: Add First Name, Last Name, and Address
Next, repeat the process to choose FirstName, followed by a space (press only the spacebar, no other keys). Then, choose LastName and press the Enter key to create a new line. Afterward, repeat the steps to select the Address field and press the Enter key again.

Step 7: Preview the Merged Letters
Before carrying out the mail merge, preview how the merged letters will appear. Go to the Mailings tab, and in the Preview Results group, click the Preview Results button to see the merged fields in the document.

Step 8: Carry Out the Mail Merge
Once you're satisfied with the preview, proceed to the Mailings tab, go to the Finish group, and click the Finish & Merge button. Select Edit Individual Documents to carry out the actual mail merge.

Step 9: Create Separate Letters for Each Person
In the Merge to New Document panel, click All to create a separate letter for each person on the list. Word will generate a new document with as many pages as there are names on your list, and each page will contain the correctly merged letter with the individual's details.

Step 10: Save the Merged Document
Once the merge is complete, save the new document with an appropriate name, such as ABC.docx, to keep your merged letters organized.
