If you're facing issues with the PC Health Check tool not showing results, you're not alone. This tool, designed to help users check Windows 11 compatibility, can sometimes encounter problems where it doesn't display the expected results. In this guide, we'll cover 6 methods to fix PC Health Check not showing results, providing step-by-step instructions to resolve the issue. Whether the tool isn't working correctly or not displaying results, these troubleshooting steps will help you get your PC Health Check tool running smoothly.
Table of Content
- What is the PC Health Check App?
- Why is Your PC Health Check App Not Showing Results?
- Method 1: Run the System File Checker (SFC) Tool
- Method 2: Check for Latest Windows Updates
- Method 4: Perform a Clean boot on Your Windows
- Method 5: Restore the PC Health Check App to Previous Versions
- Method 6: Repair the PC Health Check App
- How to Fix PC Health Check Not Showing Results - FAQ's
What is the PC Health Check App?
The app was introduced back in 2021 to Windows 10 users to help users with potential issues in their PCs. It is a simple application that helps users identify and fix all the problems in their PCs that might be slowing down their computers or maybe causing a crash. The app can also help you to free up storage space, it can reduce your PC's boot-up time. To improve your PC's startup performance, make sure your computer is up to date always. It's a great tool for anyone who wants to keep their PC healthy and faster.
Why is Your PC Health Check App Not Showing Results?
There can be several reasons why the PC Health Check app might not be showing results. Some of the possible causes are:
- The app might be corrupted or may not be installed correctly on your PC.
- You might be using an outdated version of the PC Health Check App.
- The version of your Windows operating system might be outdated to run the app. Make sure you are using at least Windows 10 higher versions.
- The computer does not meet the minimum system requirements to run the app properly.
Now let's analyze the methods which can help us to fix the PC health check app and we will be able to see the results.
Method 1: Run the System File Checker (SFC) Tool
In a few cases, the files of the app may get corrupted during updates. This might be the reason that the PC health check app is not working properly and not showing results. To fix the corrupted files of any app on your PC, we can use the SFC scanner.
The System File Checker (SFC) tool scans your system for corrupted files and can fix them. The SFC tool can be accessed directly via the command prompt. Follow the below steps to run the system file checker and fix the PC health Check app.
Step 1: Go to start type cmd and press enter to open the command prompt.

Step 2: Type the following command in the command prompt and press enter.
sfc/scannow
Step 3: Wait till the scans are complete 100%.
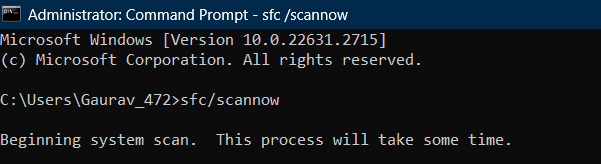
Step 4: Once the scan is complete 100 % restart your PC.

Step 5: Now you can run the PC health check app and it will show results as any corrupted files will be fixed by the SFC scanner.
Method 2: Check for Latest Windows Updates
The current version of your Windows Health Check app might be outdated that's why it is not functioning properly. To fix this install the latest version of the Windows Health Check app through the Windows updates.
Step 1: Go to settings.

Step 2: Click on Windows Updates present in the bottom left corner.

Step 3: Click on Check for Updates.
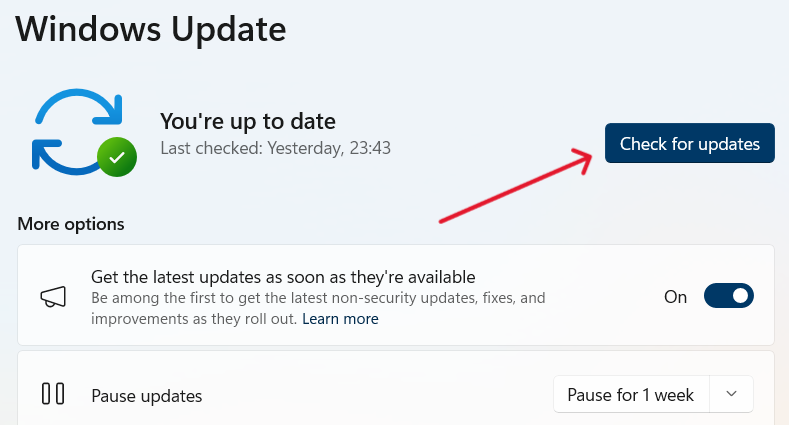
Step 4: Download and install all the suggested updates.
Step 5: Restart your computer and now try to run the PC Health Check app it will work perfectly now.
Method 3: Uninstall and Reinstall the Latest Version
If the above 2 methods didn't work for you then don't worry. In this method, we will teach you how to directly install the latest version of the PC Health Check app from the official Microsoft Windows site which will fix your error completely.
Before installing the latest version of the PC Health Check app uninstall the current version of the app from your PC.
Step 1: Go to settings.

Step 2: Click on apps.

Step 3: Click on installed apps.
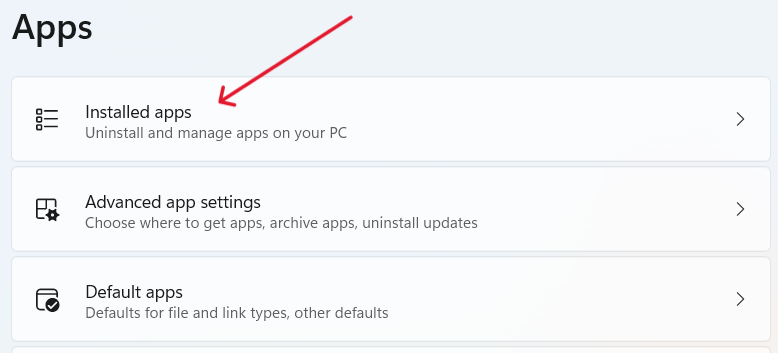
Step 4: Search for PC Health Check and click on uninstall.

Now once you have uninstalled the app follow the below steps to download and install the latest version of the PC Health Check app.
Step 5: Click on the following link to download the latest version of the PC health check app.
https://download.microsoft.com/download/b/2/9/b2965f3b-0410-4d93-995f-5bc8a5d56916/4.0/x64/WindowsPCHealthCheckSetup.msiStep 6: A download will start automatically click on save to accept it.
Step 7: Once the download is complete open the setup.
Step 8: Read the instructions and click on the checkbox to accept the terms & conditions and then click on install to start the installation.

Step 9: Once the installation is complete click on Finish.

Step 10: The PC health check will open automatically and now it will show the required results.

Method 4: Perform a Clean boot on Your Windows
Clean boot is a troubleshooting method that helps in identifying the application that is causing an error. By performing a clean boot, users can effectively determine the issues caused by conflicting software programs.
Step 1: Press the Windows key + R to open the run dialog box type msconfig and press enter.

Step 2: Enable the use original boot configuration option and move to services.

Step 3: Click on Hide all Microsoft services and click on the Disable All option.

Step 4: Go to Startup and click on Open Task Manager.

Step 5: Now Right-click on each task and disable it.
Step 6: Restart your PC now and try to install the updates freshly the error will be fixed now.
Method 5: Restore the PC Health Check App to Previous Versions
If the current version of the app is not working properly then try to restore the app to a previous version in which it was working perfectly. To restore the app to a previous version follow the below steps.
Step 1: Search for the PC health check app in Start and click on the open file location.

Step 2: Right-click on the PC health check app and click on properties.

Step 3: Click on the previous version tab.

Step 4: If the app had any previous version installed on your system click on that version and click on OK.
Step 5: Restart your computer the error will be resolved. Now.
Method 6: Repair the PC Health Check App
In some cases, the apps get damaged or corrupted during Windows updates. To fix this we can repair the apps to restore their functionalities. Follow the below steps to repair the PC health check app.
Step 1: Go to settings.

Step 2: Select Apps.

Step 3: Click on installed apps.

Step 4: In the search bar search for the PC health check app and then click on the three dots.

Step 5: Click on advanced options.

Step 6: Scroll down a little bit and click on the repair option.

Step 7: Once the repair is done restart your PC and try to open the PC health check app again.

Conclusion
Fixing the issue of PC Health Check not showing results is crucial for determining your PC’s compatibility with Windows 11. By applying these 6 methods, you can troubleshoot and resolve most PC Health Check app problems and ensure that the tool functions as expected. From updating the tool to adjusting system settings, these solutions are effective at resolving PC Health Check errors and getting the app to display the necessary results.