React Native: Zero to Hero — From JavaScript to Native Mobile Apps
A story-driven guide where every topic answers three questions: What problem does it solve? What real app makes it obvious? And how do you actually build it?
If you’re coming from web development, React Native can feel familiar at first.
You write JavaScript.
You use React.
You create components.
But underneath, React Native works very differently from React on the web.
There is no browser DOM. There is no HTML rendering your UI.
Instead, your JavaScript describes real native mobile components.
This guide takes you from the foundations of React Native to performance, native APIs, testing, shipping, and AI-integrated mobile apps.
Part 1: The Foundations
1. React Native’s Core Idea: Write JavaScript, Get Native Views
One of the first things beginners need to understand is this:
React Native does not run your UI inside a browser.
There is:
- No HTML
- No DOM
- No Chrome rendering your screen
When you write:
<View>
  <Text>Hello</Text>
</View>
React Native turns that description into actual native UI components.
On iOS, this ultimately maps to native views such as UIView.
On Android, it maps to native Android views.
Your JavaScript describes what the UI should look like, while React Native handles the native implementation.
Why does this matter?
Because React Native isn’t simply “web development with mobile CSS.”
Layout, gestures, animations, performance, and platform behavior all inherit characteristics from native mobile development.
That is why understanding the underlying architecture becomes extremely important as your applications get larger.
2. The Three Threads
If there is one React Native concept you should understand deeply, it’s the relationship between the different execution contexts involved in rendering your application.
A simplified mental model looks like this:
ThreadResponsibilityAnalogyJS ThreadReact code, business logic, state, API-related workThe brainShadow ThreadLayout calculation using YogaThe architectUI/Native ThreadDrawing UI and handling native interactionsThe hands
The JavaScript thread might be responsible for:
const [count, setCount] = useState(0);The layout system calculates where that component should appear.
The native/UI side actually renders the result on the device.
Why does this matter for performance?
Imagine you’re loading a huge amount of data and performing expensive JavaScript work.
If the JavaScript thread becomes overloaded, anything depending heavily on it can become slow or janky.
This is why concepts such as:
- Reanimated
- Hermes
- FlatList
- FlashList
- JSI
are ultimately connected to one larger question:
Which part of the application is doing too much work, and can that work be moved somewhere more appropriate?
3. Bridge → JSI: The Evolution of React Native
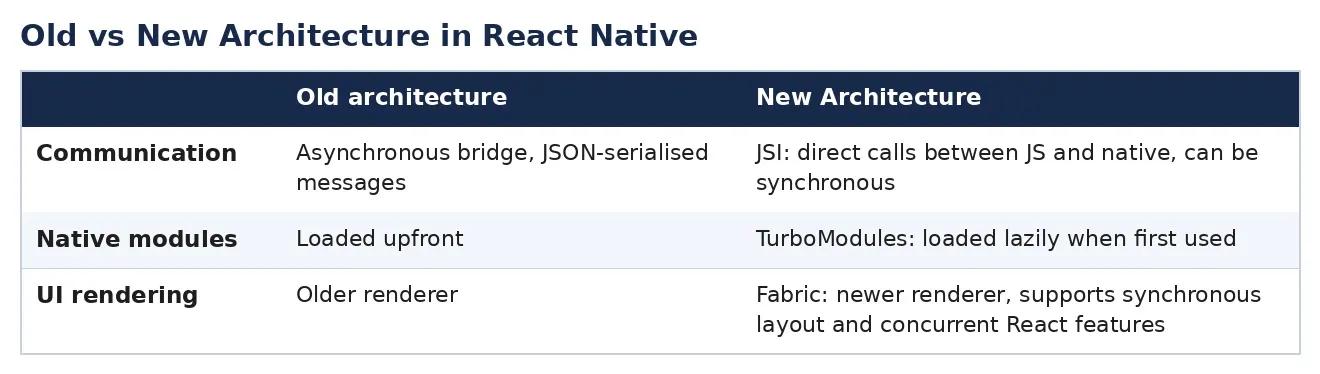
Understanding the old and new architectures is extremely useful, especially in interviews.
The Old Architecture: The Bridge
Historically, JavaScript and native code communicated through an asynchronous bridge.
Conceptually, you can imagine it like this:
JavaScript
    ↓
Serialize data
    ↓
Bridge
    ↓
Deserialize data
    ↓
Native
There was overhead involved in moving and serializing data between JavaScript and native code.
Think of it like two people who don’t speak the same language passing messages through a small window.
It works, but there is overhead.
The New Architecture: JSI
JSI, or JavaScript Interface, changed this model.
It provides a much more direct interface between JavaScript and native/C++ code.
The simplified idea is:
JavaScript
    ↕
   JSI
    ↕
Native / C++
The New Architecture is built around technologies such as:
- JSI
- Fabric
- TurboModules
Fabric
Fabric is React Native’s newer rendering system.
It provides a more modern rendering architecture and enables capabilities such as more predictable rendering and synchronous layout-related operations.
TurboModules
TurboModules allow native modules to be loaded more efficiently, including lazy loading instead of loading everything immediately.
This can help improve startup behavior.
Reanimated
Libraries such as Reanimated can take advantage of the newer architecture to execute animation-related logic closer to the UI side instead of relying entirely on JavaScript.
Interview Question: Bridge vs JSI
A good 90-second explanation is:
“The old React Native architecture used an asynchronous bridge for communication between JavaScript and native code, which introduced serialization and communication overhead. The New Architecture uses JSI to provide a more direct interface between JavaScript and native code. Fabric is the newer rendering system, while TurboModules improve how native modules are loaded.”
If you’re preparing for React Native interviews, know this explanation extremely well.
Part 2: Building Real Screens
4. Flexbox in React Native
If you’re coming from web development, there is an important difference to remember.
In CSS:
flex-direction: row;is the default.
In React Native, the default is:
columnFor example:
<View style={{ flex: 1, flexDirection: 'column' }}>
  <View style={{ flex: 1 }} />
  <View style={{ flex: 2 }} />
</View>
The second view receives twice the available flexible space of the first.
So:
flex: 1
flex: 2
means a ratio of:
1 : 2It does not mean fixed pixel sizes.
Mental model
Think about a vertically structured mobile screen:
┌─────────────────┐
│                 │
│     Section 1   │  flex: 1
│                 │
├─────────────────┤
│                 │
│     Section 2   │  flex: 2
│                 │
│                 │
└─────────────────┘
Once you understand Flexbox ratios, responsive layouts become much easier to reason about.
5. FlatList → FlashList
Imagine you have a social media feed containing 1,000 posts.
A beginner might do:
{posts.map(post => (
  <PostCard post={post} />
))}
inside a ScrollView.
The problem?
You’re potentially mounting a huge number of components at once.
That can consume significant memory and make scrolling slow.
FlatList
React Native provides FlatList for this problem.
<FlatList
  data={posts}
  renderItem={({ item }) => (
    <PostCard post={item} />
  )}
  keyExtractor={(item) => item.id}
  windowSize={5}
  removeClippedSubviews
/>
FlatList uses virtualization.
Instead of rendering every item in a huge list, it focuses on items around the visible area.
This is one of the most important performance concepts in React Native.
FlashList
At larger scales, list performance can become even more important.
FlashList, created by Shopify, takes a different approach by recycling views/components rather than constantly mounting and unmounting them.
Think of it like a movie production.
Instead of building new chairs for every scene, you reuse the same chairs and simply change who sits on them.
This can significantly reduce the overhead associated with large lists.
Mental model
ScrollView
→ render everything
FlatList
→ render what's neededFlashList
→ efficiently recycle what's needed
6. Navigation: Think About WhatsApp
Most React Native applications need some combination of three navigation patterns:
Stack
Used when moving deeper into content.
Chat List
    ↓
Chat Room
    ↓
Profile
Example:
<Stack.Navigator>
  <Stack.Screen
    name="ChatList"
    component={ChatList}
  />
<Stack.Screen
name="ChatRoom"
component={ChatRoom}
/>
</Stack.Navigator>Tabs
Used for major sections of an application.
Chats | Status | CallsExample:
<Tab.Navigator>
  <Tab.Screen
    name="Chats"
    component={ChatsStack}
  />
<Tab.Screen
name="Status"
component={Status}
/>
</Tab.Navigator>Drawer
Used for side menus and navigation panels.
The real skill isn’t simply knowing these three.
It’s understanding how to nest them.
For example:
Tabs
 ├── Chats Stack
 │    ├── Chat List
 │    └── Chat Room
 │
 ├── Status
 │
 └── Calls
This structure is common in real applications.
Part 3: Making Your App Feel Alive
7. Animations: Why Apps Feel Janky
The original React Native Animated API often relies on JavaScript to calculate animation updates.
If your JavaScript thread is busy, animations can become less responsive.
Historically, developers could use:
useNativeDriver: trueto move certain animations away from JavaScript.
But there were limitations, especially for more complex interactions.
8. Reanimated
Reanimated provides a more powerful model for animations.
Animation logic can run closer to the UI side using worklets.
For example:
const offset = useSharedValue(0);const animatedStyle = useAnimatedStyle(() => ({
transform: [
{
translateX: offset.value
}
]
}));offset.value = withSpring(150);
The important idea isn’t memorizing the API.
It’s understanding where the animation is running.
If the user is dragging something with their finger, you want the interaction to remain responsive even if JavaScript is busy.
This is why gesture-heavy interfaces such as:
- Swipeable cards
- Bottom sheets
- Interactive filters
- Drag-and-drop interfaces
often rely on Reanimated and Gesture Handler together.
9. Gesture Handler
React Native’s older PanResponder approach processes gesture information through JavaScript.
For complex gestures, that can become limiting.
react-native-gesture-handler provides native gesture recognition.
This is particularly useful for:
- Swiping
- Pinching
- Dragging
- Long presses
- Interactive sheets
The mental model is simple:
Finger
  ↓
Native gesture recognition
  ↓
Animation
  ↓
Smooth UI response
Part 4: State, Storage & Networking
10. Local State vs Global State vs Server State
One of the most common architectural mistakes beginners make is treating every piece of data as the same type of state.
They’re not.
Local State
Use local state for information belonging primarily to a screen/component.
const [isModalOpen, setIsModalOpen] = useState(false);Examples:
- Modal open/closed
- Selected tab
- Input value
- Temporary UI state
Global State
Global state is shared across different parts of your application.
Libraries such as:
- Zustand
- Redux
can help manage it.
Examples:
- Authentication state
- Theme
- User preferences
- Shopping cart
Server State
Server state is different.
This data:
- Lives on a server
- Can become stale
- Usually needs fetching
- May require caching
- May need retries
- May need background refetching
Examples:
- User profile
- Feed
- Orders
- Notifications
This is where tools such as TanStack Query become useful.
For example:
const { data: order, isLoading } = useQuery({
  queryKey: ['order', orderId],
  queryFn: () => fetchOrderStatus(orderId),
  refetchInterval: 5000
});
Instead of manually reinventing caching, retries, stale-data management, and refetching, a server-state library handles much of that complexity.
The simple rule
useState
→ local UI state
Zustand / Redux
→ shared application stateTanStack Query
→ server state
This distinction will save you from a lot of unnecessary architecture problems.
11. Local Storage: AsyncStorage vs MMKV vs SQLite
Think about opening a messaging app while your phone is in airplane mode.
Your previous conversations can still be visible.
That’s local persistence.
But not every storage solution is designed for the same job.
AsyncStorage
Good for simple key-value data.
Historically, it has been a common choice in React Native applications.
MMKV
MMKV is designed for very fast local key-value storage and integrates well with the modern React Native architecture.
Get Slaki’s stories in your inbox
Join Medium for free to get updates from this writer.
It’s useful for things such as:
- Settings
- Flags
- Small pieces of persistent data
SQLite
When your data becomes relational and queryable, SQLite-based storage makes more sense.
For example:
“Show me all messages from this contact from the last 30 days.”
That’s a database query, not simply a key-value lookup.
Rule of thumb
Small settings / flags
        ↓
       MMKV
Large / relational / queryable data
↓
SQLite12. Real-Time Data: WebSockets
Some applications don’t just request data.
They need the server to continuously send updates.
Think about a ride-sharing application.
Your driver’s location changes constantly.
You don’t want the client to repeatedly ask:
"Where is the driver?""Where is the driver?""Where is the driver?"
Instead, you can maintain an open WebSocket connection.
const socket = io('https://your-api.com');socket.on('driverLocation', (coords) => {
setDriverPosition(coords);
});The server can push updates when they happen.
WebSockets are particularly useful for:
- Chat
- Live locations
- Multiplayer applications
- Live order tracking
- Real-time dashboards
The key distinction:
REST
→ request / response
WebSocket
→ continuous real-time communicationPart 5: Going Native
13. Permissions
Mobile operating systems have strict rules around permissions.
For example, an application using the camera needs permission to access it.
On iOS, you need to provide a usage description.
On Android, permissions may need to be requested at runtime.
Conceptually:
const { status } =
  await Camera.requestCameraPermissionsAsync();
if (status !== 'granted') {
// Explain why camera access is needed
}Never assume users will automatically grant permissions.
A good application should handle:
Permission granted
Permission denied
Permission permanently denied
gracefully.
14. Push Notifications
How does a food delivery application tell you:
Your order is out for delivery.
even when the app is closed?
Push notifications.
The major platform services are:
iOS
→ APNs
Android
→ FCMYour backend typically stores device push tokens and sends notifications when relevant events occur.
Expo provides APIs that simplify much of this cross-platform work.
15. Native Modules
Sometimes JavaScript isn’t enough.
Imagine you need to access:
- Bluetooth hardware
- HealthKit
- Advanced device APIs
- Platform-specific functionality
You may need native code.
That could mean writing:
Swiftfor iOS and:
Kotlinfor Android.
You then expose the native functionality to JavaScript through a native module.
This is where having access to the ios/ and android/ projects becomes extremely useful.
Part 6: Performance
16. Hermes
Hermes is a JavaScript engine designed specifically for React Native applications.
Its design focuses on mobile performance, including startup time and memory usage.
A simplified model is:
JavaScript
    ↓
Hermes
    ↓
Mobile execution
Understanding the JavaScript engine underneath your React Native application becomes increasingly important when optimizing startup and runtime performance.
17. Re-render Hell
Here’s a common performance problem.
Imagine typing into a search box causes your entire screen to stutter.
The problem might not be the input itself.
It could be unnecessary parent re-renders causing many child components to render again.
For example:
Bad
<Child onPress={() => doSomething()} />A new function can be created during every render.
Better
const handlePress = useCallback(
  () => doSomething(),
  []
);
<Child onPress={handlePress} />Other tools include:
React.memo
useMemo
useCallback
But don’t use them blindly.
The goal is not:
“Memoize everything.”
The goal is:
Find expensive unnecessary work and prevent it when it actually matters.
18. Image Optimization
Image-heavy applications can consume a lot of memory.
Think about Pinterest.
You could potentially have hundreds of images on a single screen.
Using optimized image loading and caching becomes important.
Libraries such as:
expo-imagereact-native-fast-image
can provide more advanced image caching and loading behavior.
The important principle is:
Don’t download and decode a huge image when the user only needs a small version of it on screen.
Part 7: Testing & Shipping
19. Testing Pyramid
A useful React Native testing strategy has multiple levels.
Unit & Component Tests
Tools:
Jest
React Native Testing Library
Focus on behavior.
Instead of asking:
“Does this internal state variable exist?”
ask:
“When the user presses this button, does the correct UI appear?”
E2E Testing
Tools include:
Detox
Maestro
These tests simulate real user interactions against your application.
For example:
Launch app
 ↓
Login
 ↓
Open chat
 ↓
Send message
 ↓
Verify message appears
The closer the test is to real user behavior, the more confidence it can provide in critical flows.
20. Expo Bare Workflow, EAS Build & OTA Updates
A useful mental model:
Managed Expo
Expo tooling
+
Less native configuration
Great for getting started quickly.
Bare Workflow
Expo tooling
+
ios/
+
android/
+
Custom native code
You get more control over the native projects.
EAS Build
Cloud-based builds for your mobile applications.
EAS Update
Allows JavaScript and asset updates to be delivered without requiring a full native rebuild.
However, there is an important limitation:
OTA updates cannot magically add new native code or native capabilities.
If you change native code or certain native configuration, you generally need a new native build.
Part 8: Platform Quirks
React Native is cross-platform.
That doesn’t mean iOS and Android are identical.
You need to understand their differences.
ConceptiOSAndroidShadowsshadowColor, shadowOffset, shadowOpacity, shadowRadiuselevationBack navigationSwipe/navigation gesturesBack button / BackHandlerSafe areasImportant for notches/home indicatorsDevice-dependentKeyboardKeyboardAvoidingView behaviorDifferent behavior/configurationPush notificationsAPNsFCM
These differences are exactly the kind of details that appear in real production bugs.
Part 9: AI-Integrated Mobile Apps
This is where React Native becomes particularly interesting for developers working with AI.
Imagine you’re building an AI assistant.
The model doesn’t necessarily return the entire response at once.
Instead:
Hello
Hello, how
Hello, how can
Hello, how can I
Hello, how can I help?
The response streams token by token.
This creates an interesting mobile UI challenge.
You might consume an SSE stream or WebSocket:
const response = await fetch(apiUrl, {
  method: 'POST',
  body: JSON.stringify(payload)
});
const reader = response.body.getReader();while (true) {
const { done, value } = await reader.read(); if (done) break; appendTokenToLastMessage(
decode(value)
);
}
But there’s a trap.
If you update React state for every single token, you can create a huge number of renders.
Instead, you can batch updates.
For example:
Token
Token
Token
Token
        ↓
Batch
        ↓
UI update
You might flush accumulated tokens every ~50ms instead of triggering a state update for every token.
This small optimization can make a big difference in perceived smoothness.
And this is exactly where understanding React Native performance becomes valuable for AI applications.
Your React Native Study Path
If you’re learning React Native from scratch, don’t try to learn everything simultaneously.
Follow this order.
Week 1
Learn:
- JS/UI threads
- Bridge vs JSI
- Flexbox
- Stack navigation
- Tab navigation
Build: A static multi-screen application.
Week 2
Learn:
- FlatList
- FlashList
- Zustand
- TanStack Query
- API integration
Build: A feed application using a real API.
Week 3
Learn:
- Reanimated
- Gesture Handler
Build: A swipeable card interface.
Make the interaction feel genuinely smooth.
Week 4
Learn:
- MMKV
- SQLite concepts
- WebSockets
- Permissions
- Push notifications
Build: A small real-time chat application.
Week 5
Focus on:
- Performance profiling
- Re-render optimization
- Image optimization
- Testing
- EAS Build
- Deployment
Don’t just build features.
Profile the application and find something that is actually slow.
Then fix it.
That’s where the real learning happens.
The Two React Native Interview Questions You Should Master
If you’re preparing for interviews, make these automatic:
1. Bridge vs JSI
Understand:
Old Architecture
→ Bridge
→ Serialization
→ Asynchronous communication
→ More overhead
New Architecture
→ JSI
→ Direct native/C++ interface
→ Fabric
→ TurboModules2. Old vs New Architecture
Don’t just memorize definitions.
Be able to explain why the architecture changed and what problems the new architecture solves.
Final Takeaway
React Native becomes much easier when you stop thinking of it as:
“React, but for mobile.”
Instead, think of it as:
JavaScript + React concepts + native mobile systems + performance engineering.
The deeper you go, the more the pieces connect:
Threads
   ↓
JSI
   ↓
Rendering
   ↓
Animations
   ↓
Gestures
   ↓
Lists
   ↓
State
   ↓
Networking
   ↓
Native APIs
   ↓
Performance
   ↓
Testing
   ↓
Production Apps
And if you’re building AI-powered mobile applications, there’s another layer:
React Native
      +
Streaming
      +
AI APIs
      +
Real-time UI
      +
Performance
      =
AI-powered mobile apps
That’s where React Native gets really interesting.
Don’t aim to memorize every API.
Aim to understand why the tool exists, what problem it solves, and what is happening underneath your code.
That knowledge is what separates someone who can follow a React Native tutorial from someone who can actually build and debug production applications.