Create an Org chart in PowerPoint: Quick Steps
- Open Power Point and Select Slide
- Go to the Insert Tab >> Click SmartArt
- Choose a Hierarchy Layout >> Add Details
- Adjust Layout >> Save and Present
An organogram (also known as an organizational chart or org chart) is a visual representation of the hierarchical structure of an organization. It displays relationships and relative ranks of positions within the organization. Creating an organogram is essential for business presentations, employee handbooks, company proposals, or even internal meetings to provide clarity about roles and responsibilities.
In this article, we will walk you through a step-by-step guide on how to create an organogram in PowerPoint using the tools and features PowerPoint offers, ensuring your chart is both visually appealing and easy to understand.

What is an Organogram and Why is it Important
An organogram is a graphical representation of a company's internal structure. It is used to display the hierarchical relationships between different roles, departments, or individuals within an organization.
Key benefits of an organogram include:
- Clear Representation: Shows the reporting structure and relationships within the organization.
- Improved Communication: Helps employees understand their roles and the roles of others.
- Strategic Planning: Aids in workforce management and business development.
Whether you're creating a simple org chart for a small team or a complex diagram for a large enterprise, PowerPoint provides an effective platform to design professional-looking organograms
How to Create an Organogram in PowerPoint: Step-by-Step Guide
Follow these easy steps to create a visually appealing organogram in PowerPoint:
Step 1: Open PowerPoint and Select a Blank Presentation
First, Open Microsoft PowerPoint. Start a new blank presentation to give you a clean slate to design your organogram.

Step 2: Choose the Right Slide Layout
To keep your organogram clean and well-organized, choose a layout that provides enough space for multiple levels.
- Go to the "Design" tab in the ribbon and select a blank slide layout (preferably "Title and Content" layout).
- Remove the default title box if it doesn’t fit your design.

Step 3: Use the “SmartArt” Tool to Create the Organogram
PowerPoint offers a built-in feature called SmartArt that can be used to easily create hierarchical diagrams such as organograms.
- Go to the "Insert" tab in the ribbon and click SmartArt.
- In the SmartArt Graphic gallery, select Hierarchy. This category offers several templates designed for organizational charts.
- Choose a style you prefer. "Organization Chart" is the most commonly used layout, but feel free to experiment with others.
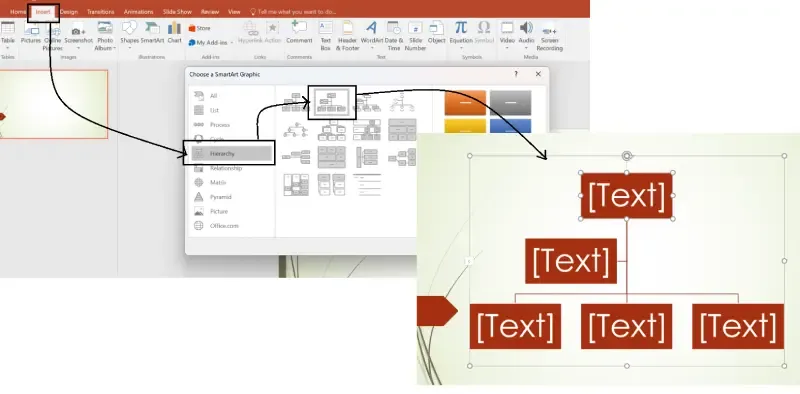
Step 4: Add Text to the SmartArt Shapes
Once you’ve selected your desired layout, it's time to add text to each box to represent the names of positions and employee roles.
- Click on any shape in the organogram to type in the position title or employee name.
- If you’re creating an organogram with several employees.

Step 5: Add Additional Shapes for More Positions
PowerPoint allows you to easily add or remove shapes to accommodate more positions or organizational levels.
- To add a new shape: Right-click on an existing shape and select "Add Shape". You can add a shape above, below, or to the side of the selected shape, depending on the structure.
- Repeat this process for all positions in the organogram.

Step 6: Customize the Design and Layout of Your Organogram
One of the best features of PowerPoint is the ability to fully customize the design of your organogram. Here are a few tips to help you enhance your organogram’s appearance:
- Change the Color: Select a shape, go to the Format tab, and choose Shape Fill to apply a color.
- Adjust the Font: Use the Home tab to change the font size, style, or color to make the text easier to read.
- Resize Shapes: You can click and drag to resize shapes to fit your text better. It’s important to make sure that the shapes remain properly aligned.

Step 7: Add Lines or Connectors for Clearer Structure
To make your organogram even more readable, use lines or connectors to clearly show the relationships between each position.
- Select a shape and click on the "Format" tab.
- Use the Line or Connector tools to draw lines between the shapes, creating a connected structure.

Step 8: Fine-Tune and Arrange Your Organogram
After adding all the shapes and connectors, it's essential to arrange the entire organogram neatly.
- Align and Distribute: Use PowerPoint’s Align and Distribute tools in the Format tab to ensure everything is evenly spaced and aligned.
- Group Elements: If your organogram is spread across multiple slides, use the Group option to keep everything together.

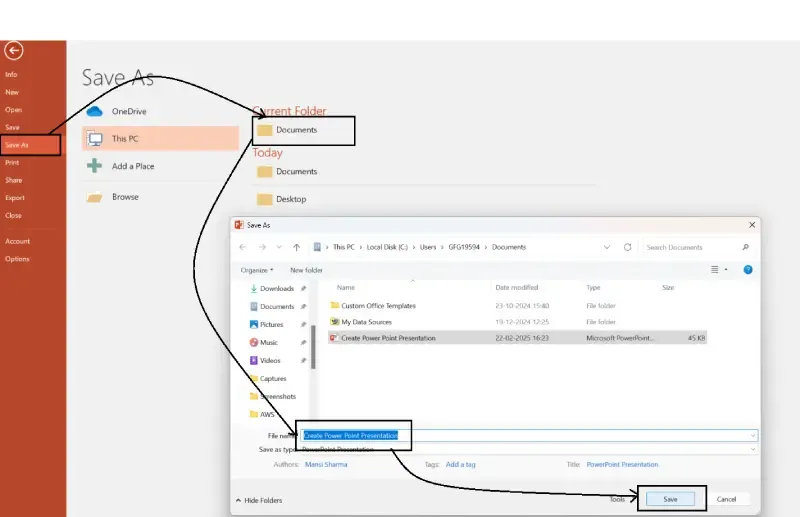
Step 9: Save and Export Your Organogram
Once you are satisfied with your organogram, save it as a PowerPoint file to allow easy editing in the future. For a non-editable version, you can export it as a PDF or image file.
- To save: Go to File > Save As and choose your desired format.
- To export as an image: Select File > Export > Change File Type > PNG or JPEG.
How to Use Org Chart Template in Power Point
PowerPoint provides built-in org chart templates that help you visualize company structures, reporting relationships, and team hierarchies with minimal effort.
Step 1: Open PowerPoint and Create a New Slide
- Launch Microsoft PowerPoint and open an existing presentation or create a new one.
- Select the slide where you want to insert the org chart template.
Step 2: Access the Built-in Org Chart Templates
- Click on File > New.
- In the search bar, type "Organization Chart" or "Org Chart".
- Browse through the available org chart templates and select one that suits your needs.
- Click Create to insert the template into your slide.

Pro Tips for Creating Professional Organograms in PowerPoint
- Keep it simple: Avoid cluttering the organogram with too many details. Focus on hierarchy and key roles.
- Use consistent colors: Stick to a consistent color scheme to make the organogram visually appealing and easy to understand.
- Limit text: Include essential details, but avoid overly long text. Use abbreviations or short phrases where possible.
- Make it interactive: For online presentations, use PowerPoint hyperlinks to allow viewers to click through different levels of your organizational structure.
Conclusion
Creating an organogram in PowerPoint is an essential skill for anyone in a managerial, HR, or leadership role. With SmartArt, PowerPoint's customizable design options, and a bit of creativity, you can build professional and visually appealing organizational charts that effectively communicate your company's hierarchy.
Whether for business meetings, corporate training, or team-building exercises, a well-designed organogram can greatly improve communication, foster understanding, and help your audience better visualize the structure of the organization.