Creating a PowerPoint presentation is an essential skill for students, professionals, and businesses. Whether you're preparing a classroom project, business proposal, marketing pitch, or webinar, PowerPoint offers a user-friendly interface and powerful design tools to create engaging and visually appealing slides.
How to Make a PowerPoint Presentation: Quick Steps
- Open PowerPoint >> Choose a Slide Layout
- Add Slide to Your Presentation
- Insert Text, Images, and Media
- Add Transitions >> Preview Presentation
- Save and Share Your Presentation
In this step-by-step guide, you’ll learn how to create a PowerPoint presentation, from choosing a template and adding content to designing slides and delivering your presentation effectively.
How to Create a PowerPoint Presentation
Creating a PowerPoint presentation is an essential skill for professionals, students, and businesses. Whether you need to make a business presentation, design a project report, or create a marketing pitch, Microsoft PowerPoint offers user-friendly tools to help you build engaging and professional slides. Follow the steps below to create a PowerPoint Presentation.
Step 1: Open Microsoft PowerPoint
To start creating a presentation, open Microsoft PowerPoint on your computer. If you don’t have PowerPoint installed, you can use PowerPoint Online via Microsoft 365.
How to Open PowerPoint
- Click on the Start Menu and search for PowerPoint.
- Click on the PowerPoint icon to open the program.
- Select Blank Presentation to start from scratch or choose a pre-designed template.

Pro Tip: Using Microsoft 365 PowerPoint allows you to access cloud storage (OneDrive) and collaborate in real-time with others.
Step 2: Choose a PowerPoint Template
PowerPoint provides a variety of built-in templates to help you create professional-looking presentations quickly.
How to Choose a Template:
- Open PowerPoint and select New Presentation.
- Click on Design in the ribbon and choose from the available templates.
- If you need more options, go to File > New and browse the template gallery.
- Select a template and click Create to apply it to your slides.

Pro Tip: Choose a template that matches your topic, audience, and branding to make your presentation more effective.
Step 3: Create and Organize Your Slides
A PowerPoint presentation consists of multiple slides, each containing different types of content.
How to Add New Slides
- Click the Home tab and select New Slide or Press "Ctrl + M"
- Choose from different slide layouts like Title Slide, Content Slide, or Image Slide.
- Click on the Slide Sorter View to rearrange slides for better flow.

Pro Tip: Use a consistent slide layout and structure to keep your presentation organized and professional.
Step 4: Add Text to Your Slides
Adding clear and concise text helps convey your message effectively.
How to Add Text in PowerPoint
- Click inside a text box on a slide.
- Type your content and use bullet points for better readability.
- Use the Font options in the Home tab to change font style, size, and color.
- Keep text short and engaging—avoid long paragraphs.

Pro Tip: Use a professional font like Calibri, Arial, or Times New Roman to enhance readability.
Step 5: Insert Images, Charts, and Graphics
Visuals make presentations more engaging and help communicate ideas more effectively.
How to Add Images in PowerPoint:
- Click on the Insert tab.
- Select Pictures to insert an image from your computer.
- Choose Online Pictures to search for royalty-free images.

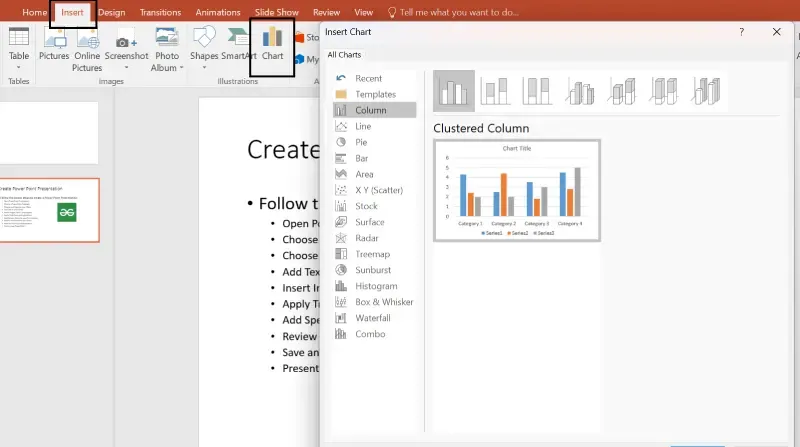
How to Add Charts and Graphs:
- Click on the Insert tab and select Chart.
- Choose a chart type like Bar, Line, or Pie Chart.
- Enter your data and customize the chart style.
Pro Tip: Use high-quality images and well-designed charts to improve engagement.
Step 6: Apply Transitions and Animations
Transitions and animations add movement and make your slides more dynamic.
How to Add Slide Transitions:
- Click on the Transitions tab.
- Choose a transition effect like Fade, Push, or Wipe.
- Adjust the speed and duration for smooth transitions.

How to Add Animations to Objects:
- Click on the Animations tab.
- Select an object (text, image, or chart).
- Choose an animation effect like Appear, Fly In, or Zoom.

Pro Tip: Use animations sparingly to avoid distractions.
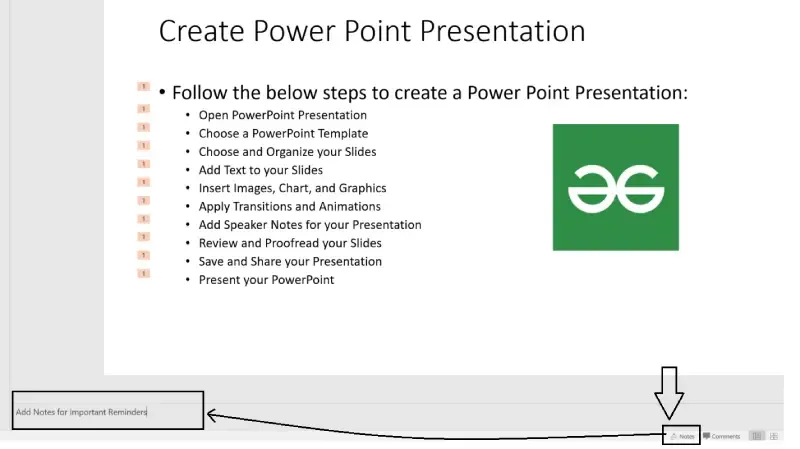
Step 7: Add Speaker Notes for Your Presentation
Speaker notes help you remember key points while presenting.
How to Add Speaker Notes:
- Click on the Notes section below the slide.
- Type important reminders or talking points.
- Use Presenter View during the presentation to see notes privately.
Pro Tip: Keep notes short and to the point for easy reference.
Step 8: Review and Proofread Your Slides
Before presenting, review your slides for spelling errors, formatting issues, and consistency.
How to Check for Errors:
- Click on Review > Spelling & Grammar to check for typos.
- Use Slide Sorter View to check the order and flow.
- Ensure consistent fonts, colors, and alignments.

Pro Tip: Ask a colleague to review your slides for clarity and readability.
Step 9: Save and Share Your Presentation
After completing your presentation, you need to save and share your presentation
How to Save Your PowerPoint File
- Click File > Save As.
- Choose PowerPoint Presentation (.pptx) for future editing.
- Select PDF if you want a non-editable version.
- Save to OneDrive for cloud access and sharing.

How to Share a PowerPoint Presentation
- Send via email as an attachment.
- Share through Microsoft Teams or OneDrive.
- Export as a video for recorded presentations.

Pro Tip: If presenting online, use PowerPoint Live in Microsoft Teams for interactive engagement.
Step 10: Present Your PowerPoint Like a Pro
When presenting, maintain eye contact, speak clearly, and engage your audience.
How to Start a Slideshow
- Click on Slide Show > From Beginning.
- Use the Presenter View for private notes.
- Navigate using arrow keys or clicker.

Pro Tip: Practice beforehand and time your presentation for a smooth delivery.