Adding a signature in Microsoft Excel helps verify the authenticity of documents and gives them a more professional look. It allows users to sign spreadsheets digitally or insert a handwritten signature image for approvals, contracts, invoices, or reports. By using Excel’s built-in signature tools or inserting a scanned signature, you can quickly personalize and secure your documents while making them ready for official use.
Methods to Add a Signature in Excel
Here are two simple methods to add a signature to your Excel sheet:
Method 1: Adding a Signature Line
A Signature Line provides a formal, visible placeholder where someone can sign ideal for approvals, reports and formal agreements.
Step 1: Open the Excel Document
- Open the Excel Document
- Select the Cell, where you want to insert the Signature

Step 2: Insert a Signature Line
- Go to the Insert tab on the Ribbon.
- Click on Text > Signature Line > Microsoft Office Signature Line.
- Fill in the required details in the pop-up dialog box, such as the signer’s name, title, and any instructions.
- Click OK to insert the signature line into your worksheet.

Step 3: Sign the Signature Line
- Right-click on the signature line and select Sign.
- Type your name or upload a digital signature image.
- You can also sign using a touchscreen or stylus if your device supports it.

If you don’t have a digital certificate, a pop-up will appear asking if you want to get a Digital ID. Simply select Yes and follow the on-screen instructions to set it up. Click here to know more.
Step 4: Save the File
Once signed, save the file to retain the visible signature. The file will now indicate that it has been signed.
Method 2: Inserting a Scanned Image of Your Signature
If you have a scanned image of your signature, you can easily add it to your Excel file.
Step 1: Prepare Your Signature Image
- Sign on paper and scan it or take a photo. Save it as a PNG or JPEG file.
Step 2: Insert the Image into Excel
- Go to the Insert tab and click Pictures.
- Select This Device and locate your signature file.
- Click Insert to add the image to your worksheet.

Step 3: Resize and Position the Image
- Drag the corners of the image to resize it.
- Move it to the desired location (e.g., near the signature line).

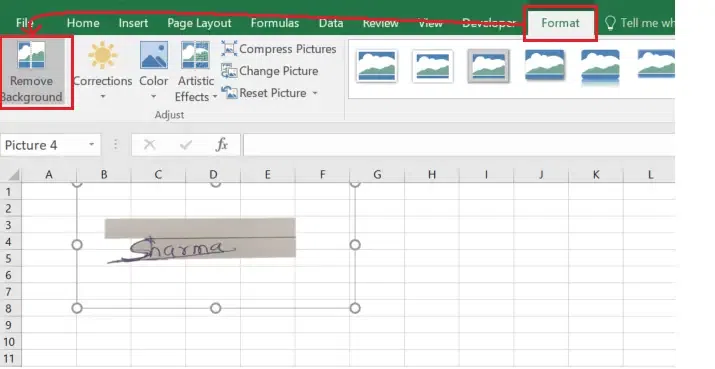
Step 4: Remove the Background (Optional)
Click on the image, go to the Picture Format tab, and select Remove Background for a cleaner look.
Tips for Adding Signatures in Excel
- Use High-Quality Images: If inserting a scanned signature, ensure the image is clear and properly cropped.
- Protect the Document: Lock the worksheet or workbook to prevent unauthorized changes after signing.
- Combine with Password Protection: Add an extra layer of security by setting a password for your file.
- Test the Signature: Always review the file to ensure the signature appears correctly.
Common Use Cases for Signatures in Excel
- Invoices and Receipts: Authenticate payment documents with your signature.
- Contracts: Sign agreements directly in Excel.
- Forms: Approve application or data entry forms.
- Reports: Add a signature to certify official reports.
- Work Orders: Validate service or product orders.