Excel Macro is simply a record button that records a set of actions performed on Excel that can be run multiple times. For example, if you have to format some raw data on a weekly basis you can use a macro to record yourself formatting the data once and let Excel automate the task in the future.
1. How to Get the Excel Developer Tab Show Up in the Ribbon?
The first step to record a macro is to get the Developer tab turned on. If you already see the Developer tab in the ribbon, then you can directly follow the steps to record a macro.
How to Enable the Developer Tab in Excel?
In order to record a macro the Developer tab on the ribbon needs to be activated as it isn't on by default within Microsoft Excel. The developer tab contains all the macro tools among various other features.
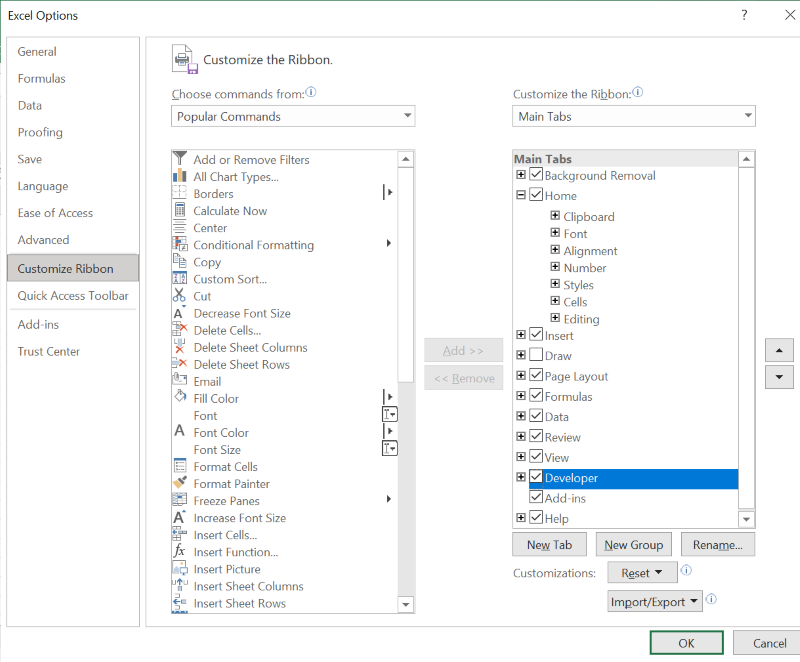
How to Activate: To activate it click on the file tab> go to options>Customize Ribbon. Under Customize the Ribbon and under Main Tabs, select the Developer check box. (The developer tab stays on the ribbon unless checked off ).
2. How to Record a Macro in Windows or Mac?
Step 1: Select Macro
Click on the view tab, select Macros(extreme right), and hit Record Macro.

Step 2: Record Macro Dialog Box and click Ok
A Record Macro Excel dialog box pops up. The record macro dialog box has 4 sections to be filled:
1. Macro name: Give a name to your macro (avoid spaces and keep it short)
Shortcut Key: you can select any letter to create a shortcut key, be careful not to override an existing shortcut key. (you can press shift and any letter in the box to create a ctrl+shift+F key)
2. Store macro in select: This workbook to run it only in the current workbook, personal macro workbook so the macro can be used within any workbook on the computer that contains that personal macro workbook and new workbook to run it in a new workbook it creates at the time of recording.
3. Description: Here you can provide additional information about the macro(what it does) for the users or ourselves.
4. Click ok and Excel will start recording all of your actions.

Step 3: Stop Recording Macro
Once done, remember to hit the stop recording button in the lower-left corner of the worksheet or head over to view>Macros>stop recording.


3. Record a Macro in Mac
Macros in Excel for Mac use VBA (Visual Basic for Applications) just like in Excel for Windows, so the recording process is quite similar.
Step 1: Launch Microsoft Excel on your Mac
Step 2: Enable the Developer Tab (if not already enabled)
Quick Tip: If you don't see the Developer tab in Excel's ribbon, you need to enable it first.
Go to Excel -> Preferences in the top menu.
In the Preferences window, click on "Ribbon & Toolbar."
Check the box next to "Developer" and click "Save."
Step 3: Open a Workbook
Open the workbook where you want to record the macro, or create a new one.
Step 4: Access the Developer Tab
Click on the "Developer" tab in the Excel ribbon. This tab should now be visible after enabling it in the previous step.
Step 5: Start Recording the Macro
In the Developer tab, click on the "Record Macro" button. This will open the "Record Macro" dialog box.
Step 6: Name Your Macro
In the "Macro name" field, give your macro a descriptive name. Avoid spaces or special characters in the name.
Step 7: Specify a Shortcut (Optional)
You can assign a keyboard shortcut to your macro if desired. This step is optional.
Step 8: Choose Where to Store the Macro
Select where you want to store the macro:
This Workbook: The macro will be available only in the current workbook.
New Workbook: The macro will be available in any new workbooks you create.
Personal Macro Workbook: The macro will be available in all workbooks you open.
Step 9: Click OK to Start Recording
After configuring the options, click the "OK" button to start recording your actions.
Step 10: Perform Your Actions
Excel will now record every action you perform, such as formatting cells, entering data, or any other task you want to automate.
Step 11: Stop Recording
When you're done with the actions you want to record, return to the "Developer" tab, and click on the "Stop Recording" button.
Your macro is now recorded and ready for use. You can run it at any time by either using the keyboard shortcut you assigned (if any) or by going to the Developer tab and selecting "Macros," then choosing your macro from the list and clicking "Run."
4. Absolute Recording and Relative Recording
A macro can be recorded in 2 ways namely Absolute and Relative recording. When you record a macro in Excel it is by default in the Absolute recording mode. In the absolute recording, the steps are performed exactly in the cells the steps were recorded in despite the active cell. In simple words, absolute recording restricts the location of steps. Relative recording executes the steps recorded in any part of the worksheet selected by the user as its relative to the starting location of the macros. Follow the steps to record a macro in Relative reference mode:
Step 1: Select a cell and Click on the Developer tab
Select the cell where you want to insert the macro and Select the developer tab.
Step 2: Select Relative Reference
In the code group, click on the 'Use Relative Reference' button. It will turn green, indicating that it's turned on.

Step 3: Click Record Macro
Click the Record Macro Button.

Step 4: Enter name for your Macro
In the Record Macro Dialog box, enter a name for your macro.

Step 5 : Select This Workbook and press Ok
In the Store macro option, make sure 'this workbook' is selected.
5. Excel Macro-Enabled Workbook
There are some file extensions that do not store a macro hence you need to be careful about using a macro-enabled format to save your workbook or the macro won’t be saved.
The default Excel format of the Excel workbook is .xlsx which does not support macros. To store macros you save and open workbooks in a new macro-enabled workbook format .xlsm. this format is the same as .xlsx but with the capability to support Excel macros.
The Excel Binary Workbook(.xlsb) and Excel macro-enabled template(.xltm) are some more file extensions that support macros within them.
6. How to Save a Macro in Excel for all Workbooks?
Step 1: Navigate to the File Tab and Select Save As
Click on the File tab and then choose Save As. The Save As dialog box appears.
Step 2: Enter the Name for the Workbook
Enter a name for the and select a location for your workbook.

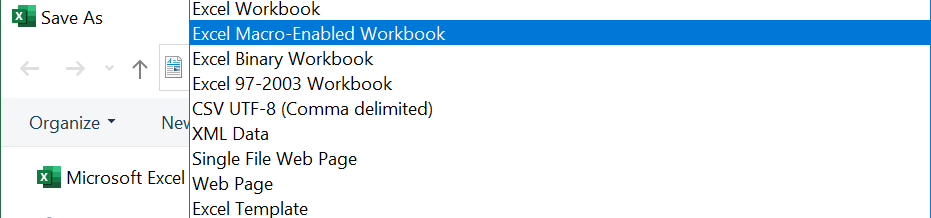
Step 3: Select the File Type
Click the Save as Type drop-down arrow. A list of file types appears.
Step 4: Click on Save
Select Excel Macro-Enabled Workbook. Click on Save.
Some more real-time applications of macros can be used to record the creation of charts based on some data, filtering and sorting data, formatting data, or importing it.
7. How to View Macros in Excel?
To examine and modify the code of an Excel macro, you can use the Visual Basic Editor. To access the Editor, either press Alt + F11 or click on the Visual Basic button found in the Developer tab.
.png)
The Visual Basic Editor features various windows, but we'll concentrate on the two primary ones:
- Project Explorer: This window displays a list of all currently open workbooks and their respective sheets. It also showcases modules, user forms, and class modules.
- Code Window: The Code Window is where you can view, edit, and write VBA code for each object listed in the Project Explorer.
8. How to Run a Macro in Excel?
We already know the basic method of How to Run a Macro using the Macro Dialog Box. But there are other methods also to run a macro in Excel as mentioned:
Run a Macro from the Ribbon( Developer Tab)
Open the workbook with Macro -> Open the Developer tab in the code group -> click Macros -> Now select the Macro you want to run -> press Run.
Using Keyboard Shortcut
Alt +F11 - This key combination will open the Macro Editor in Excel.
Alt +F8 - This key combination will open the Macro Dialog Box.
Ctrl +Shift + M- This key combination will create a new macro in Excel.
Assign the Macro to a Shape
Click on Insert tab in the Ribbon -> Click Shapes in the Illustrations Group -> Select any Shape ->Draw the Shape -> Right click on the shape and select Edit Text -> Type Run Macro -> Format the Text -> Right click on the Shape -> Select Assign Macro from drop down -> Select the Macro.
Also Read